Having issues with Windows 11? Try these steps to repair it
GeekNews , Windows OS | Updated at Aug 08, 2024
Reading time: 8 minutes 57 seconds
Microsoft releases Windows 11 updates every month to try and fix issues you may be having on your PC, but sometimes, problems are inevitable. Whether it's because of a botched Windows update, a corrupted driver, or anything else, plenty of things can cause your PC to stop functioning properly, and at that point, you may need to fix it.
Although Microsoft offers tons of maintenance tools to help you diagnose and remove operating system errors, it can be hard to know where to start if you're a beginner. As such, we've compiled a series of fixes in this article to help you resolve the issues plaguing your Windows 11 system.
Before you begin
Attempting to repair Windows should be a safe thing to do, but it is possible for things to go wrong, so it's a good idea to have backups of your most important files. The simplest way to do so is to upload them to a cloud platform like Dropbox, Google Drive, or Microsoft OneDrive. But I’d recommend creating a restore point that you can use to recover all your documents and PC settings if you accidentally damage your Windows files during the repair process. You can follow these steps to create a manual restore point in Windows 11:
- Type "Restore Point" into the Windows Search Bar.
- Click on the Create a restore point suggestion to open the System Properties pop-up window.
- Pick the drive where you want to store the restore points and click on the Configure button.
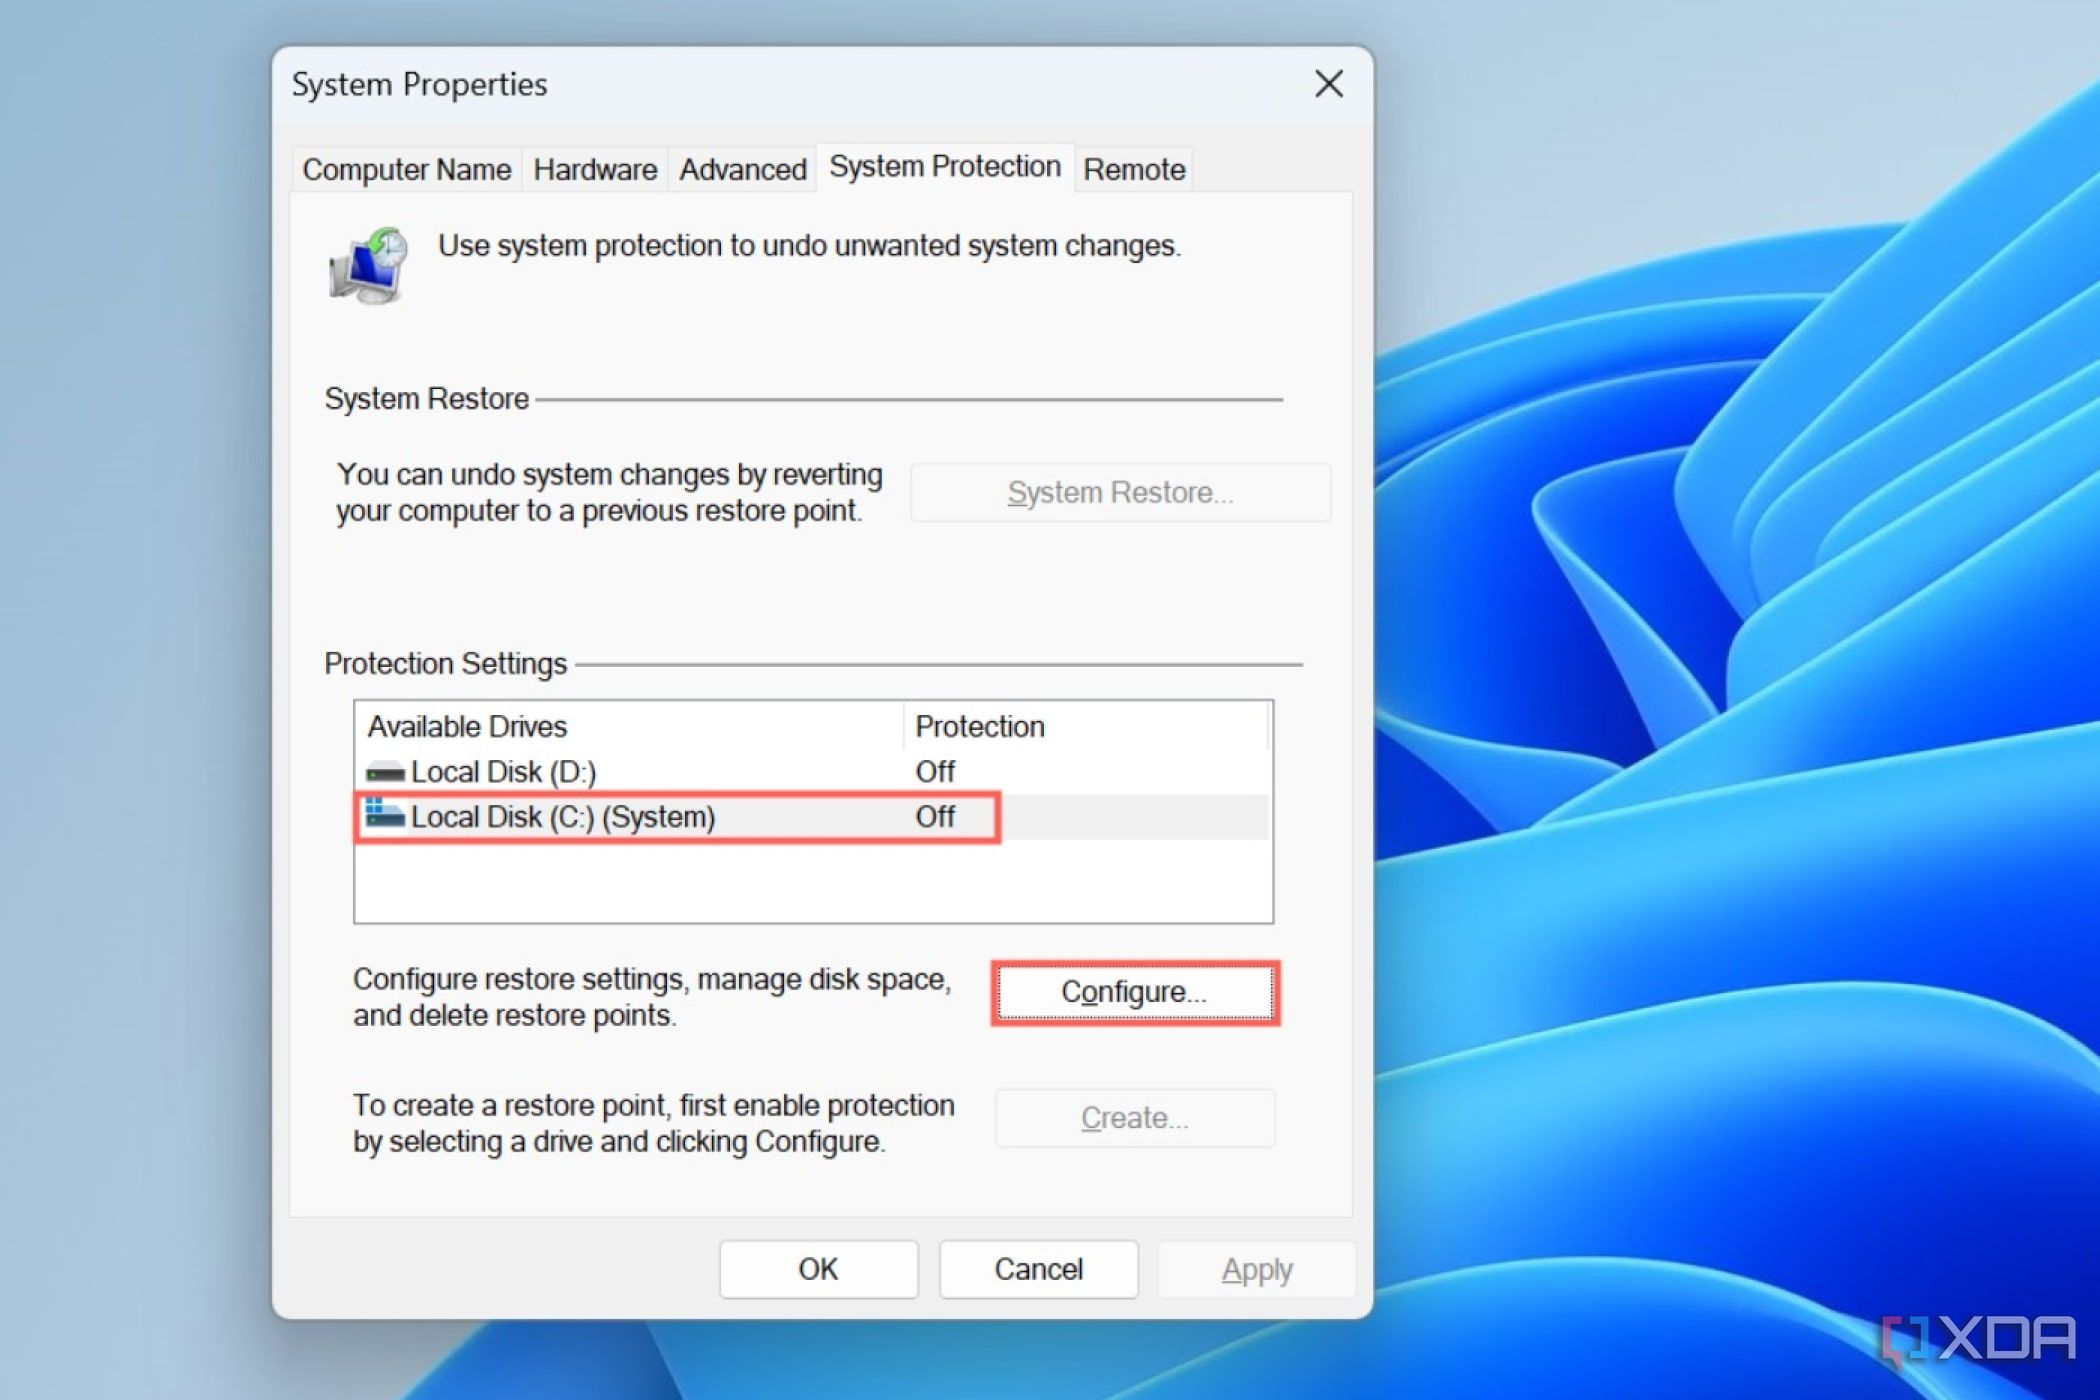
- Select the Turn on system protection option and choose the amount of disk space you want to allot for the restore points.
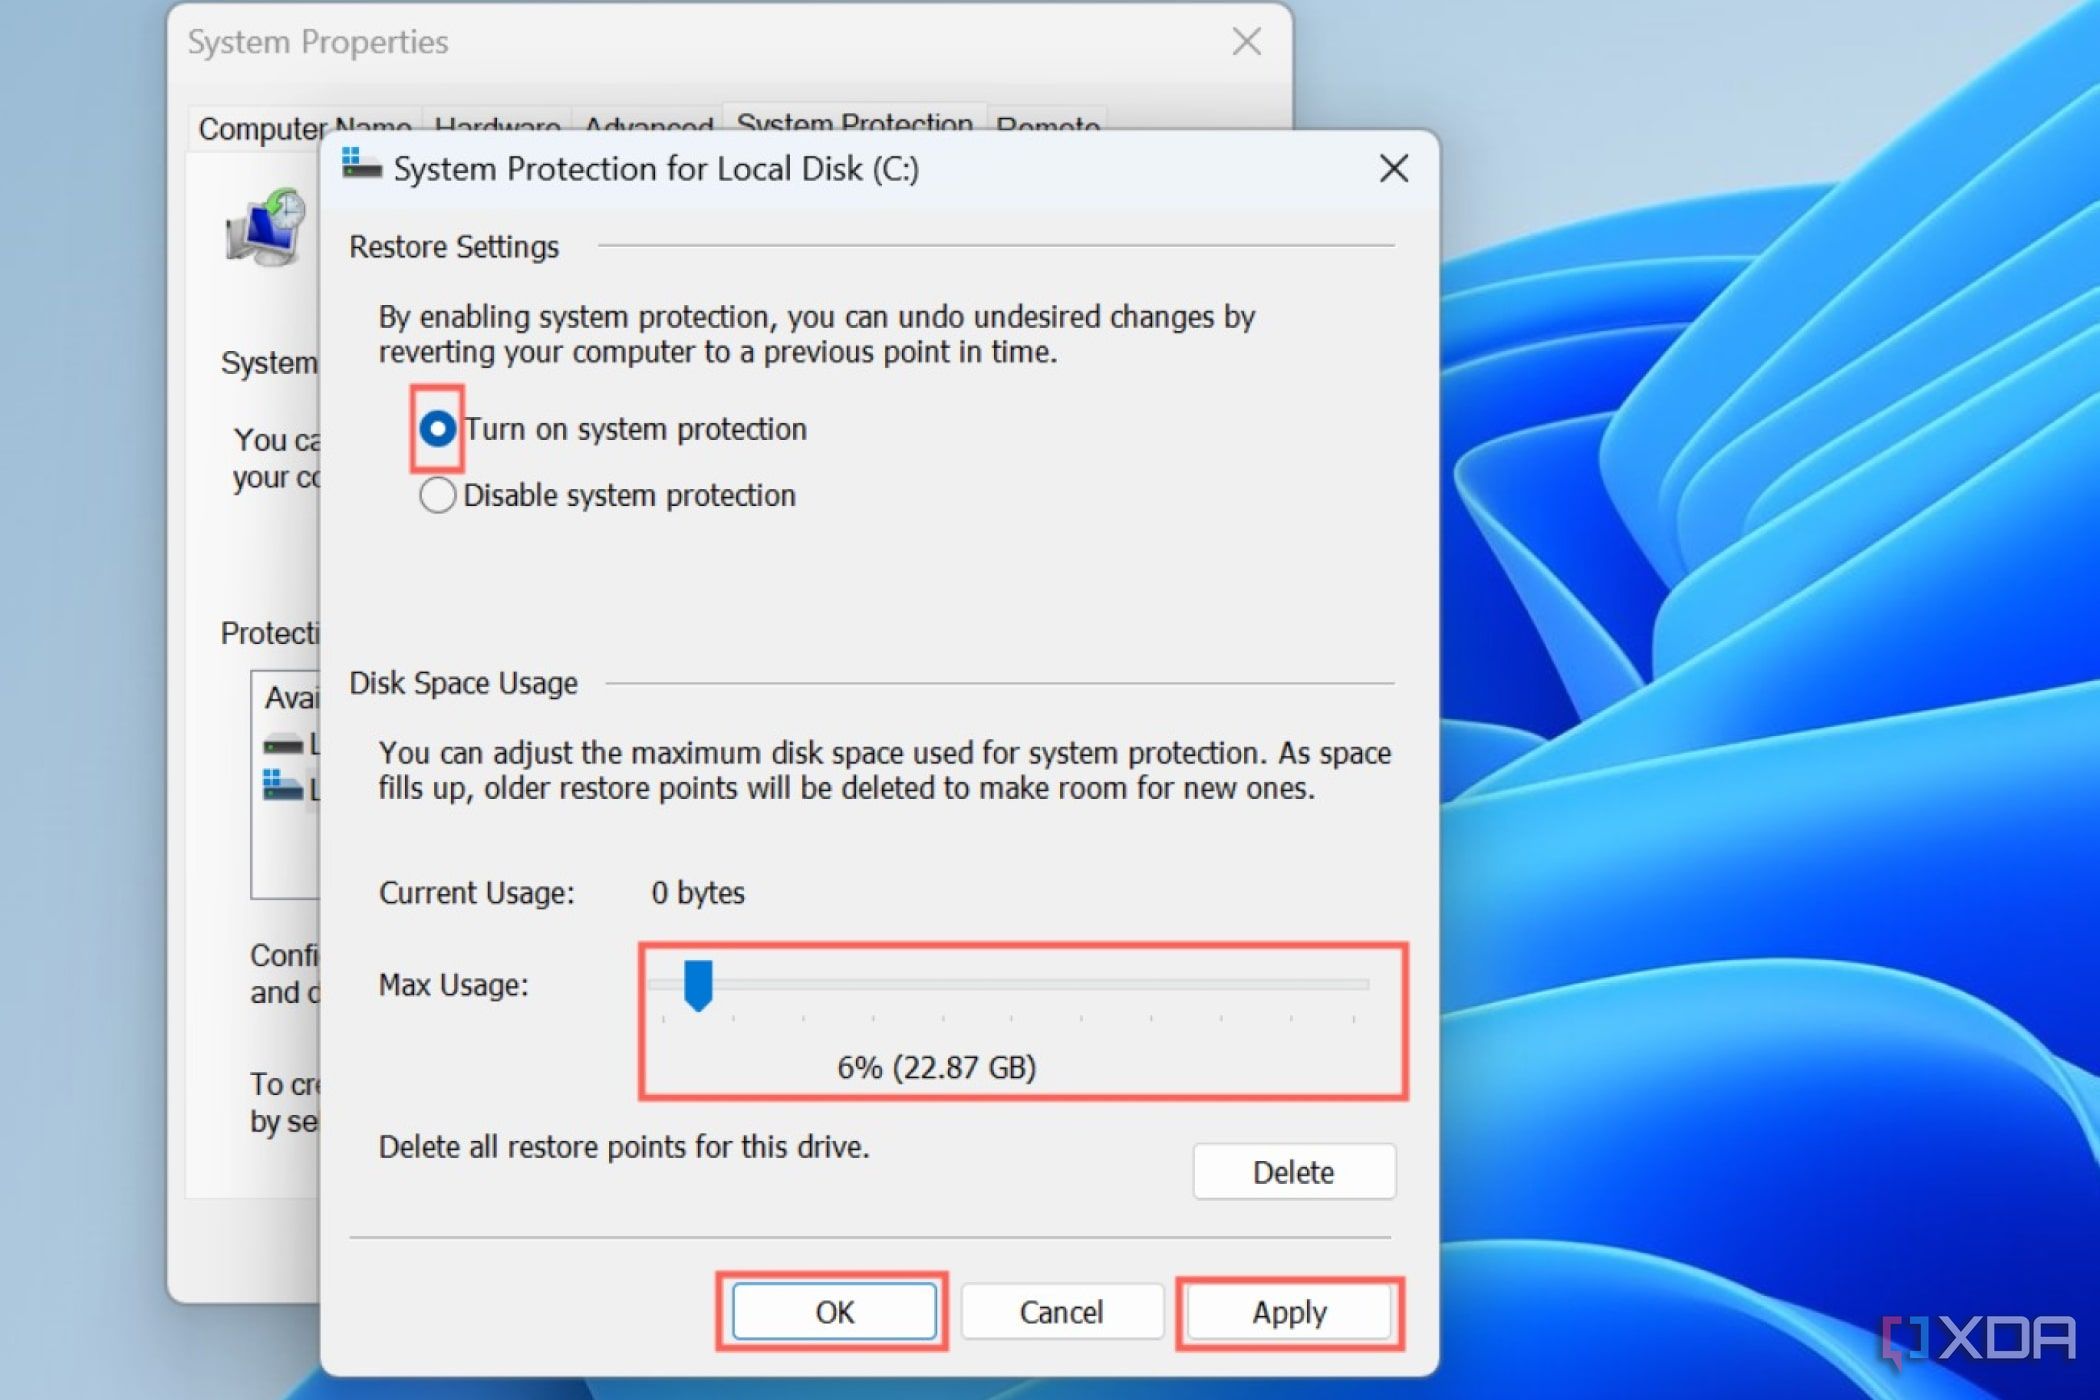
- Hit Apply and press OK to head back to the System Properties window.
- Click on Create to open the System Protection window.
- Give a name to the restore point before pressing the Create button.

- Windows will notify you when it finishes creating the save point. Click on Close and select OK.
How to repair Windows 11 using Windows troubleshooters
Running Windows troubleshooters is a preliminary fix to resolve minor issues in Windows. In some cases, the troubleshooter can root out and resolve the problems by itself without requiring you to mess around with Command Prompt or Control Panel settings.
- Right-click on the Start menu and choose Settings.
- Select the Troubleshoot submenu under the System tab.
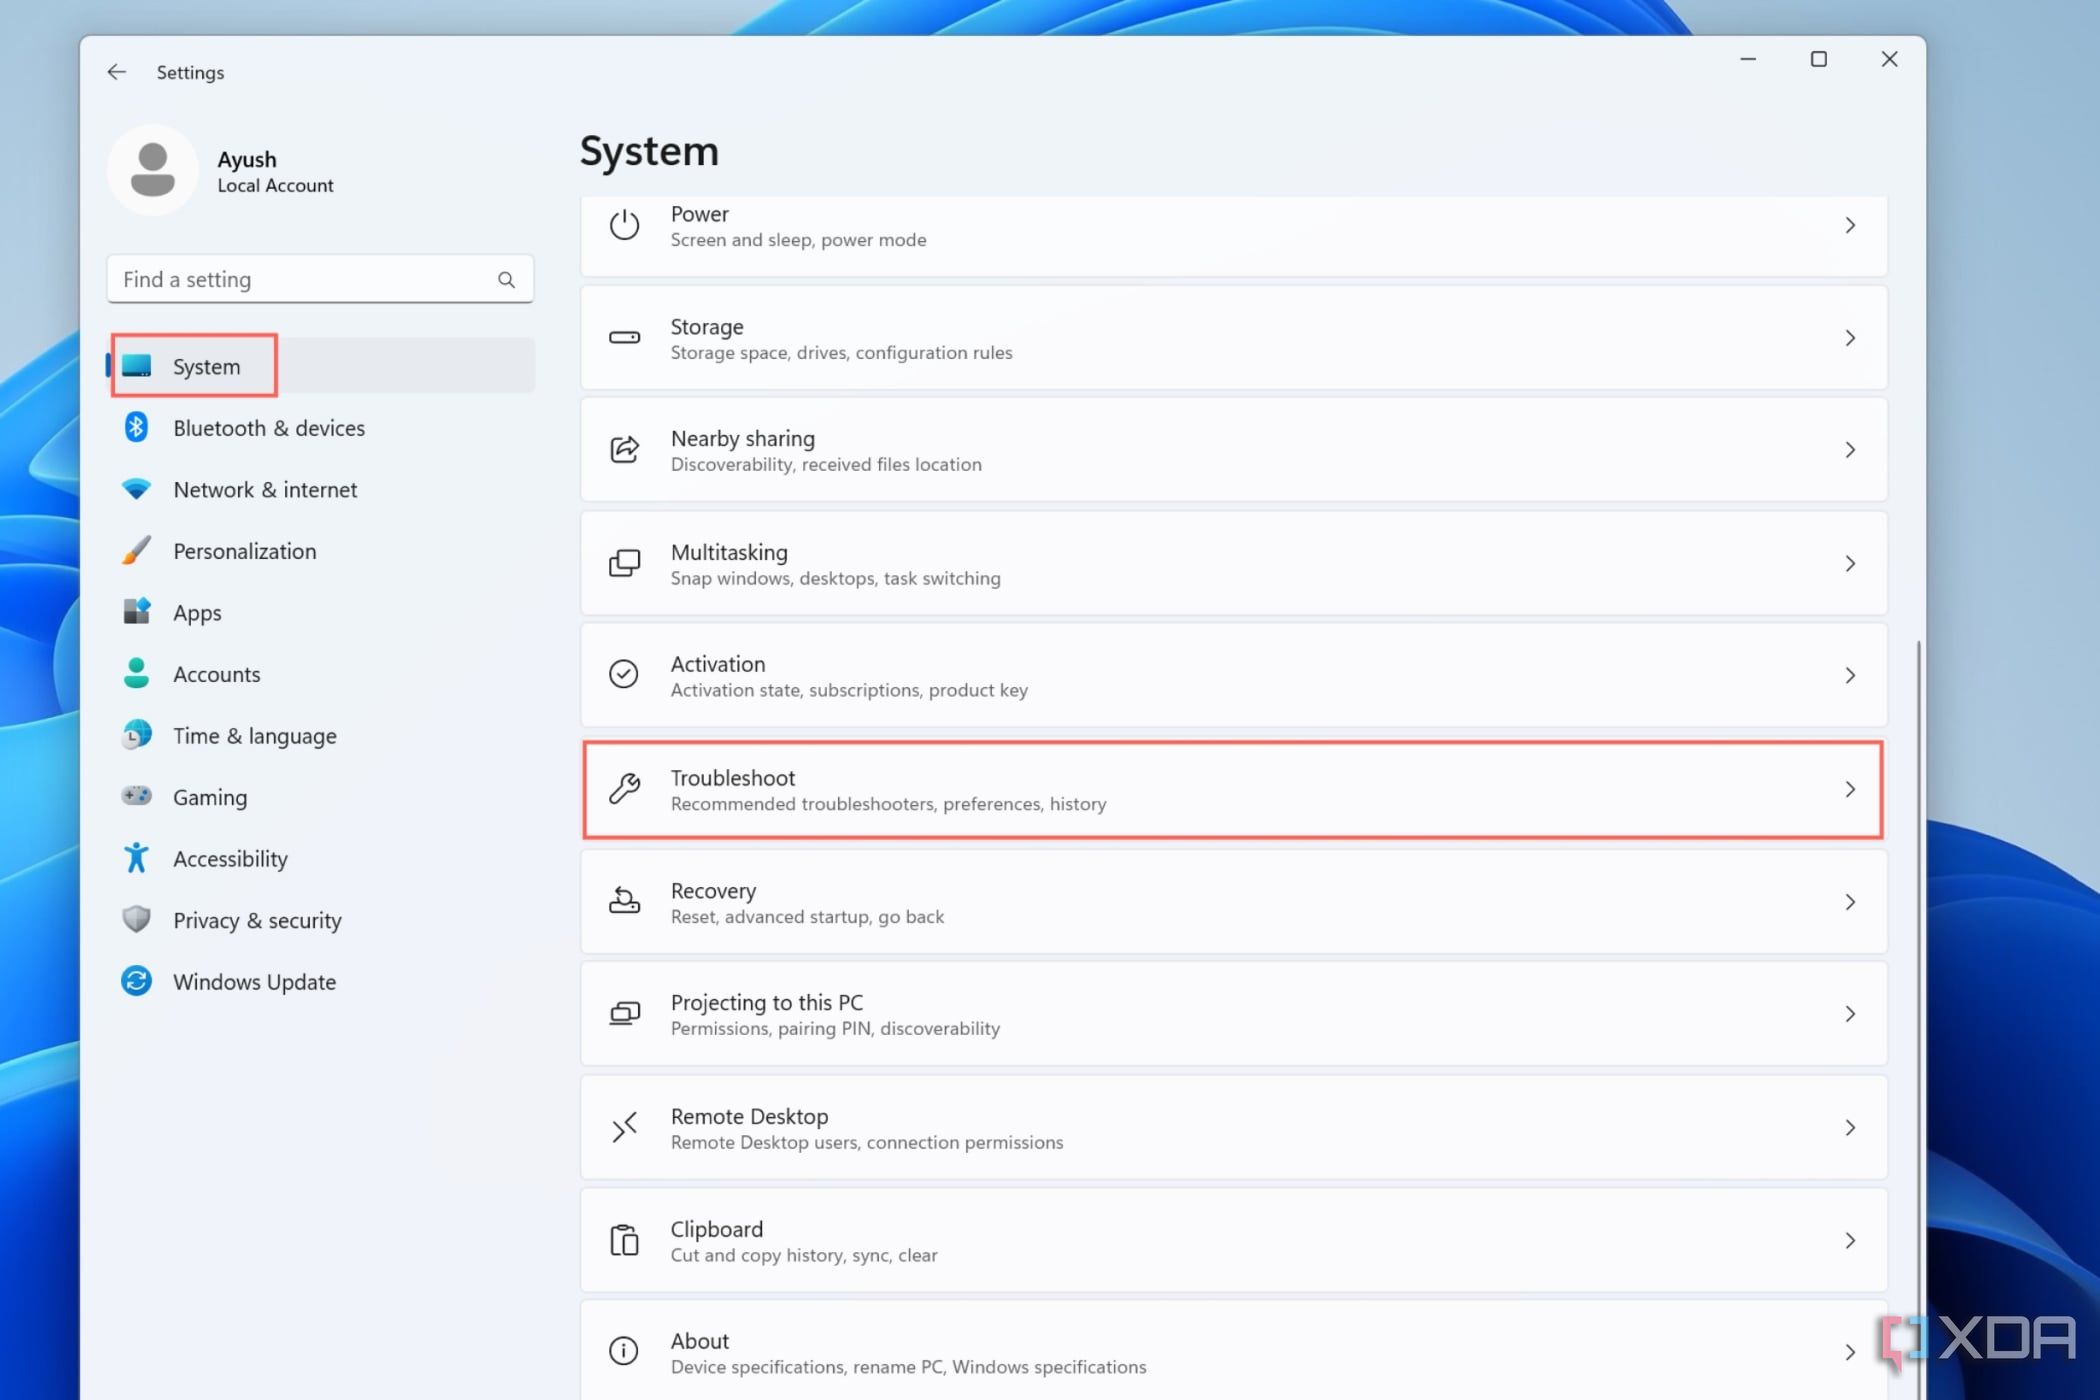
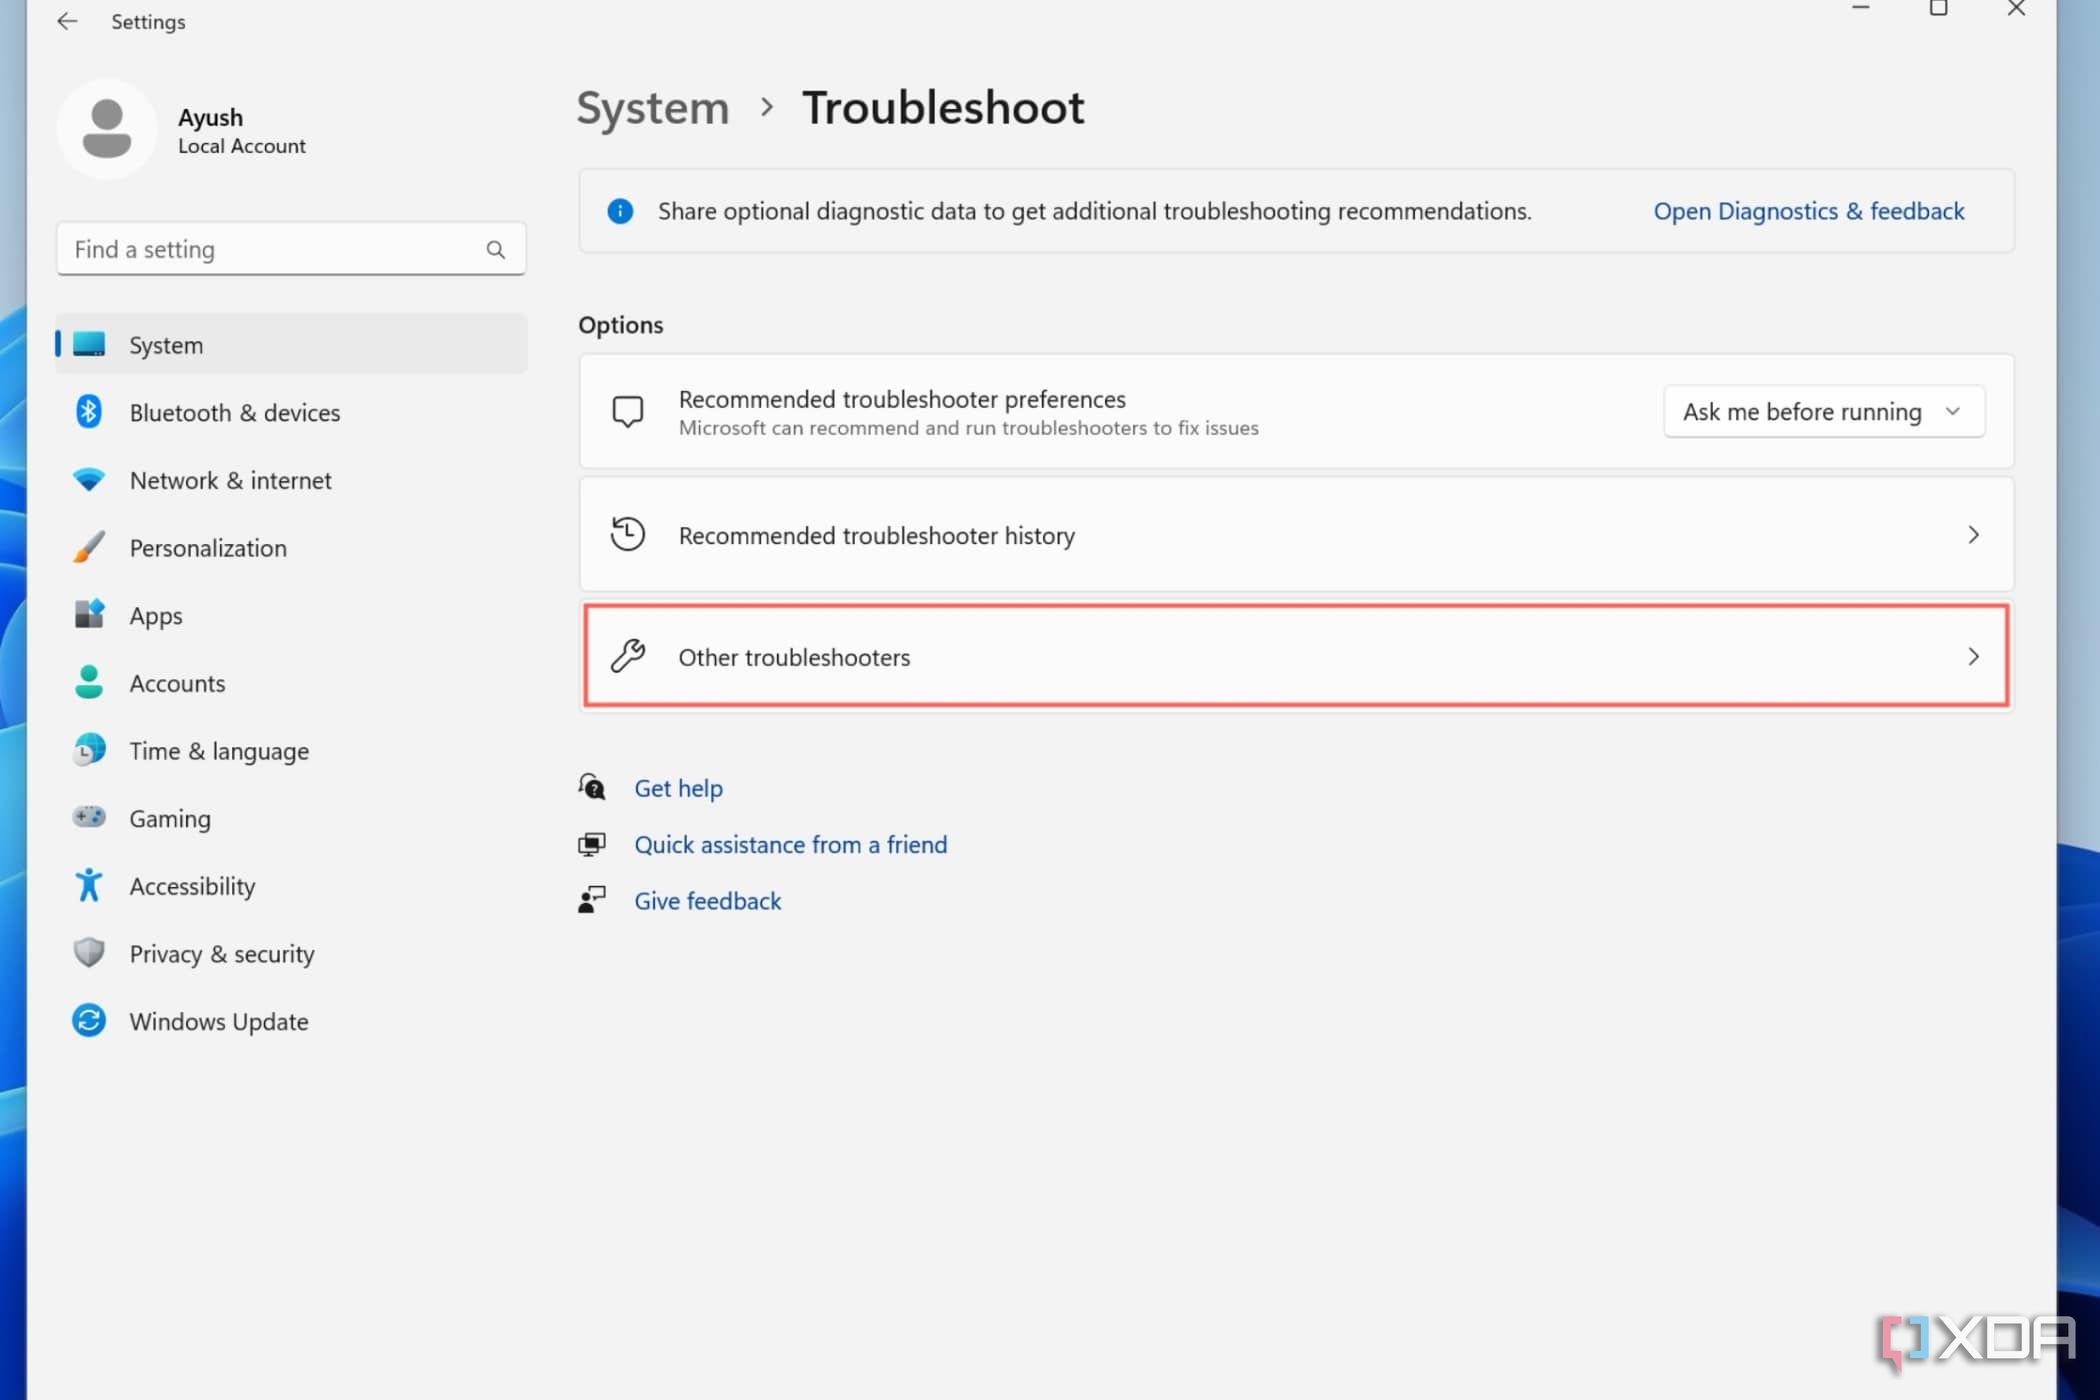
- Click on Other troubleshooters under Options and run all the troubleshooters one by one until the issue is resolved or until you reach the end of the page.
These days, Microsoft has been transitioning some of the traditional troubleshooters into the Get Help app, but the links above will still steer you in the right direction to solve your issues. Alternatively, you can simply open the Get Help app and search for the problem you're having.
How to repair Windows 11 by uninstalling Windows updates
Microsoft is notorious for releasing buggy versions of updates for Windows 11. If you notice any stability issues after installing an update, rolling back to an older version of Windows can fix your system.
- While you're on the Settings app, navigate to the Windows Update tab and click on Update history.
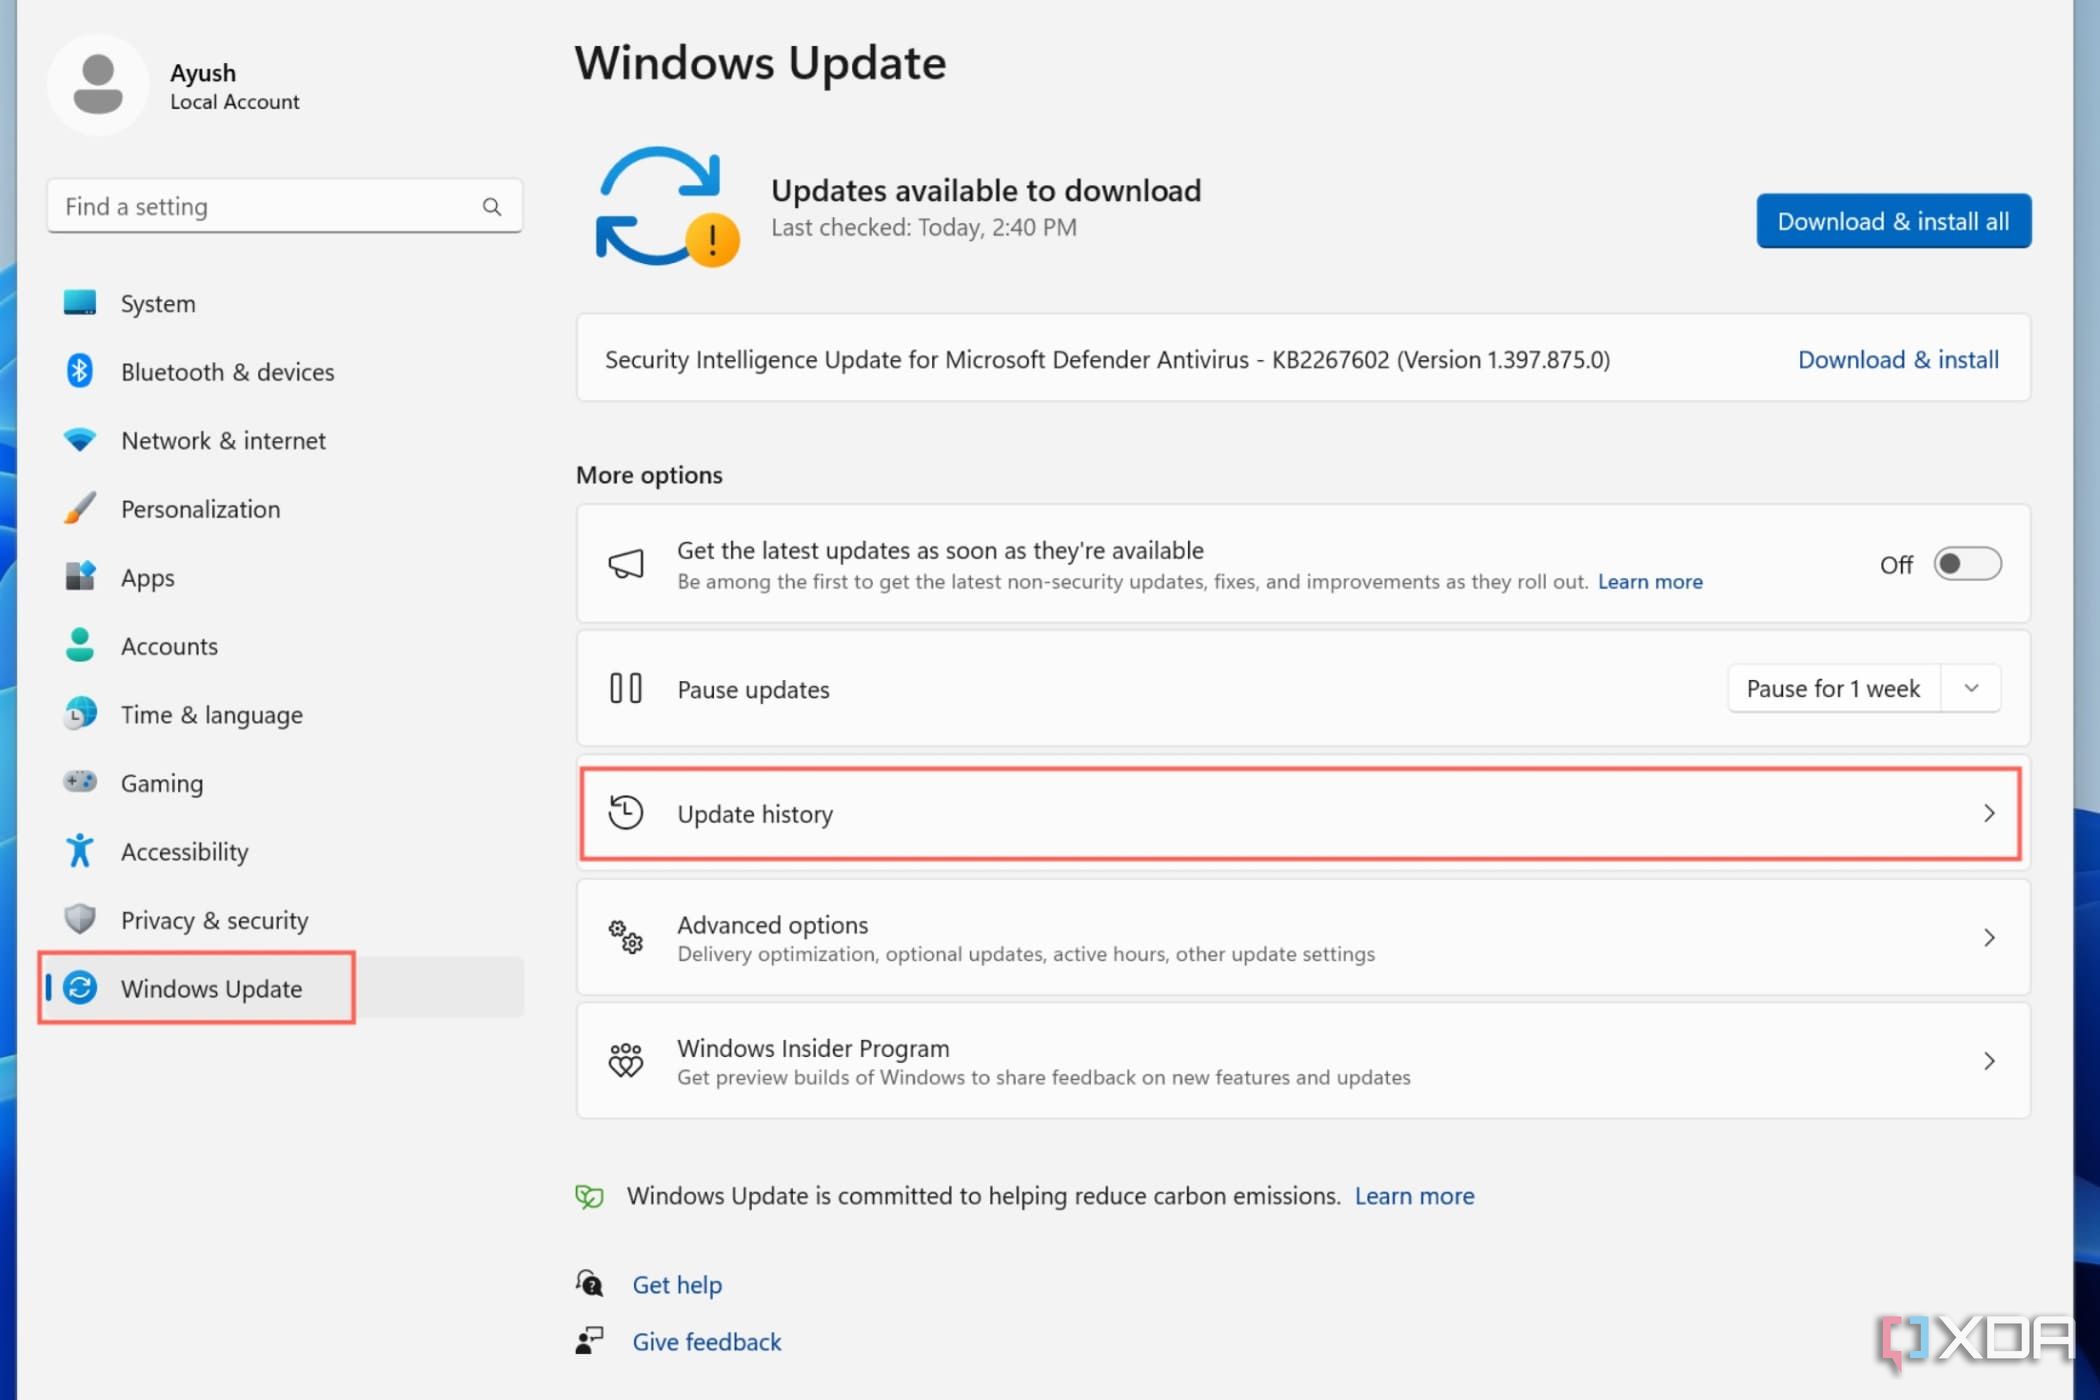
- Choose the Uninstall updates option.
- Press the Uninstall button next to the recently installed update and select Uninstall when prompted.
How to repair Windows 11 using Windows updates
Alternatively, you might want to update the operating system to the latest version, as Windows 11 updates include many patches and bug fixes, so one of them could resolve your system's issue.
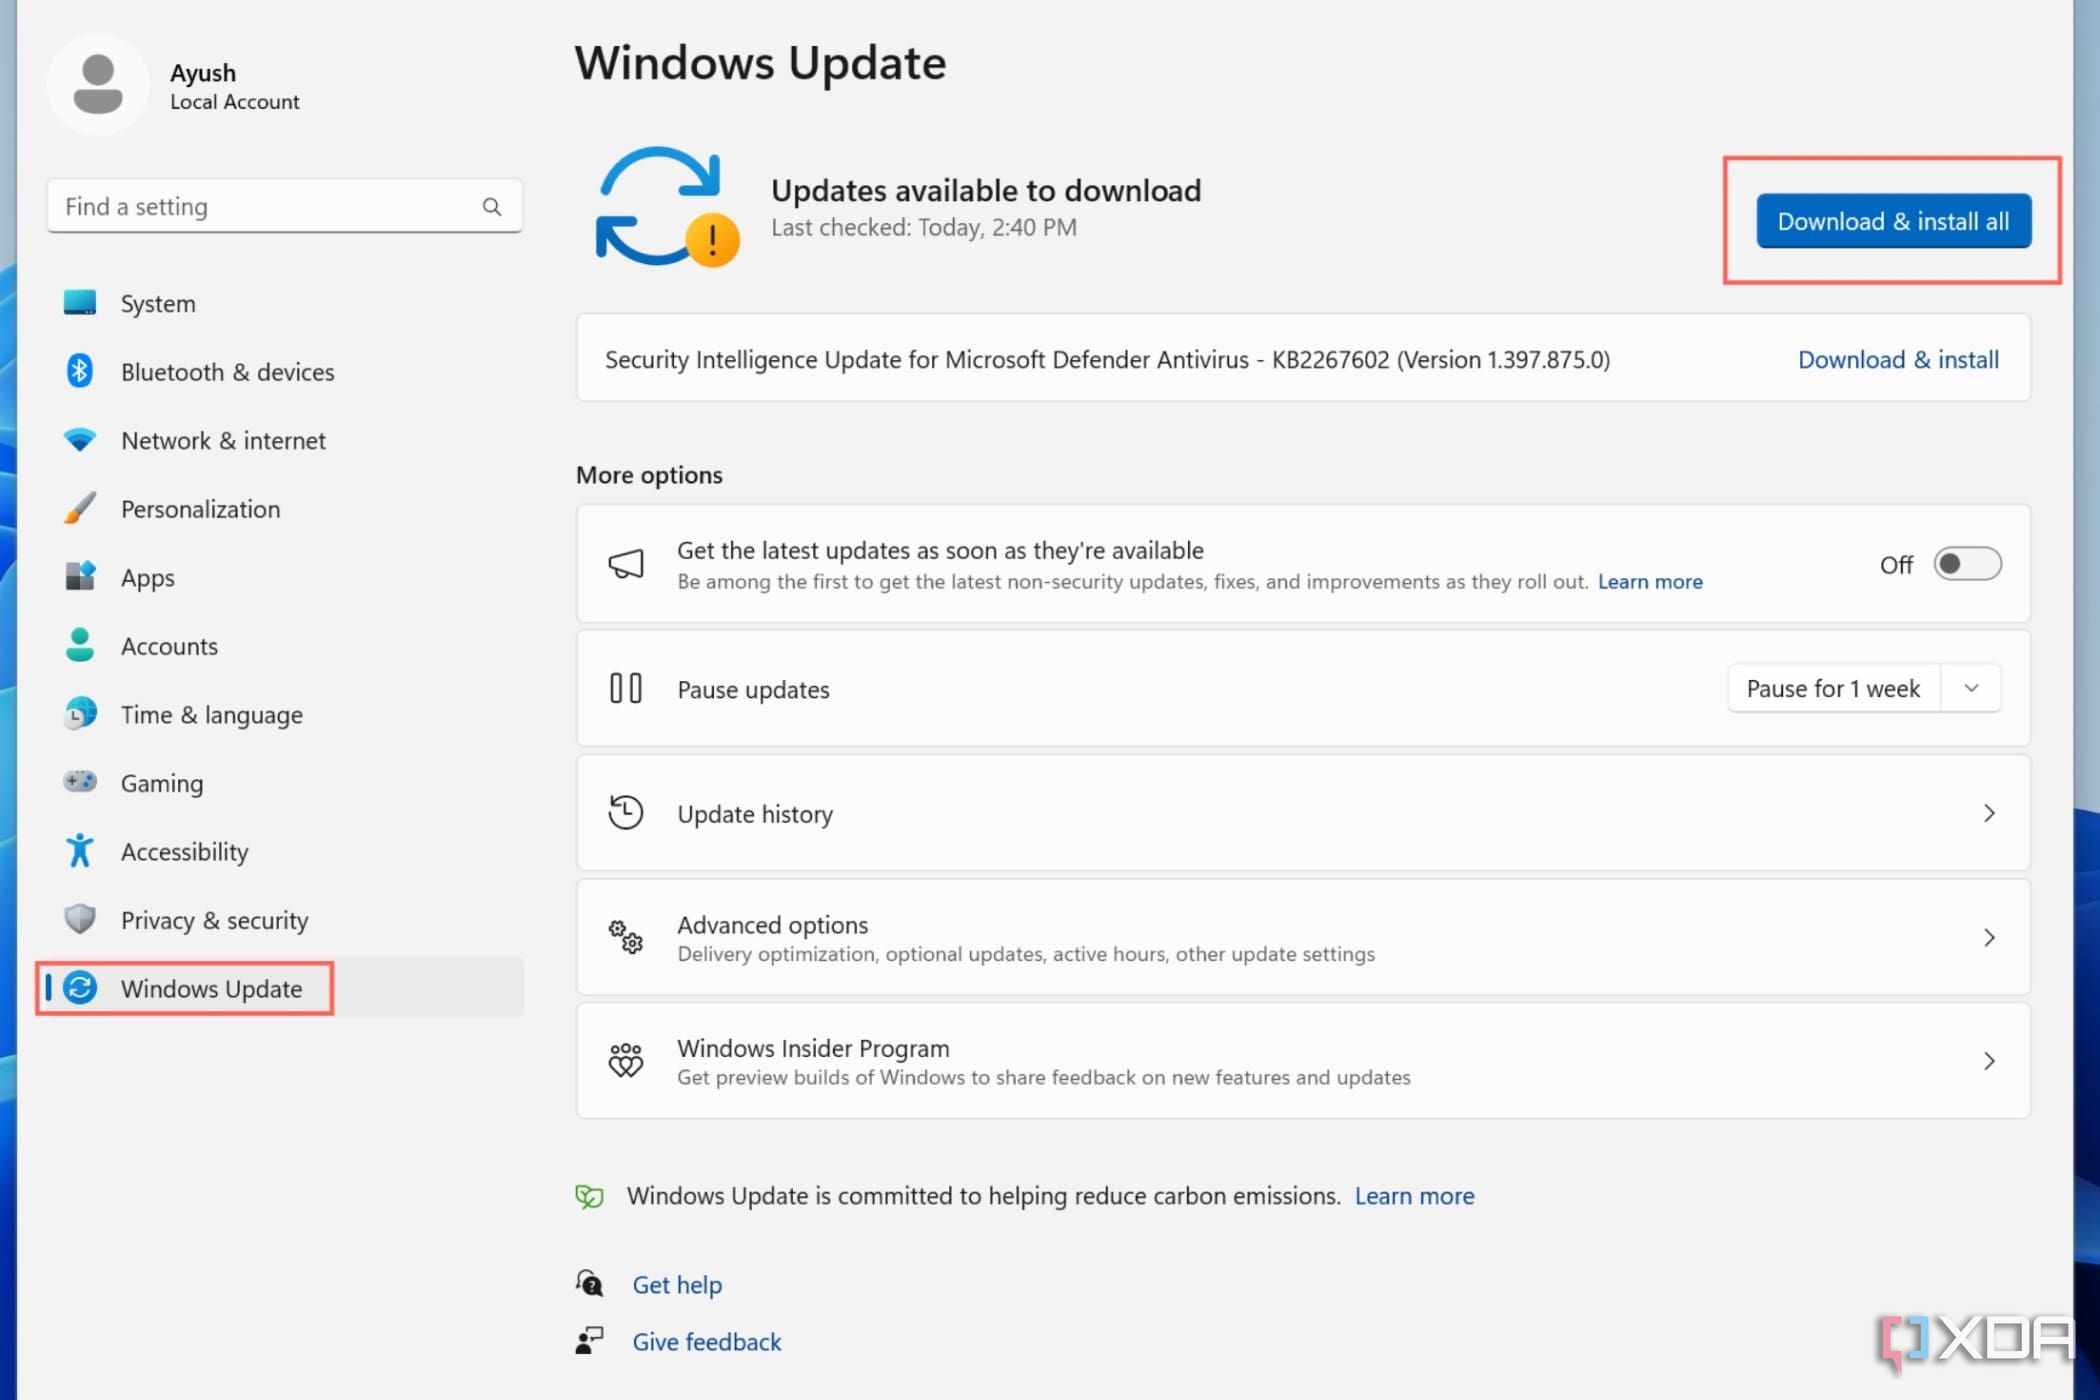
- Head to the Windows Update section of the Settings app.
- Click on the Download & install all button next to the Updates available to download section.
How to repair Windows 11 using Windows Terminal commands
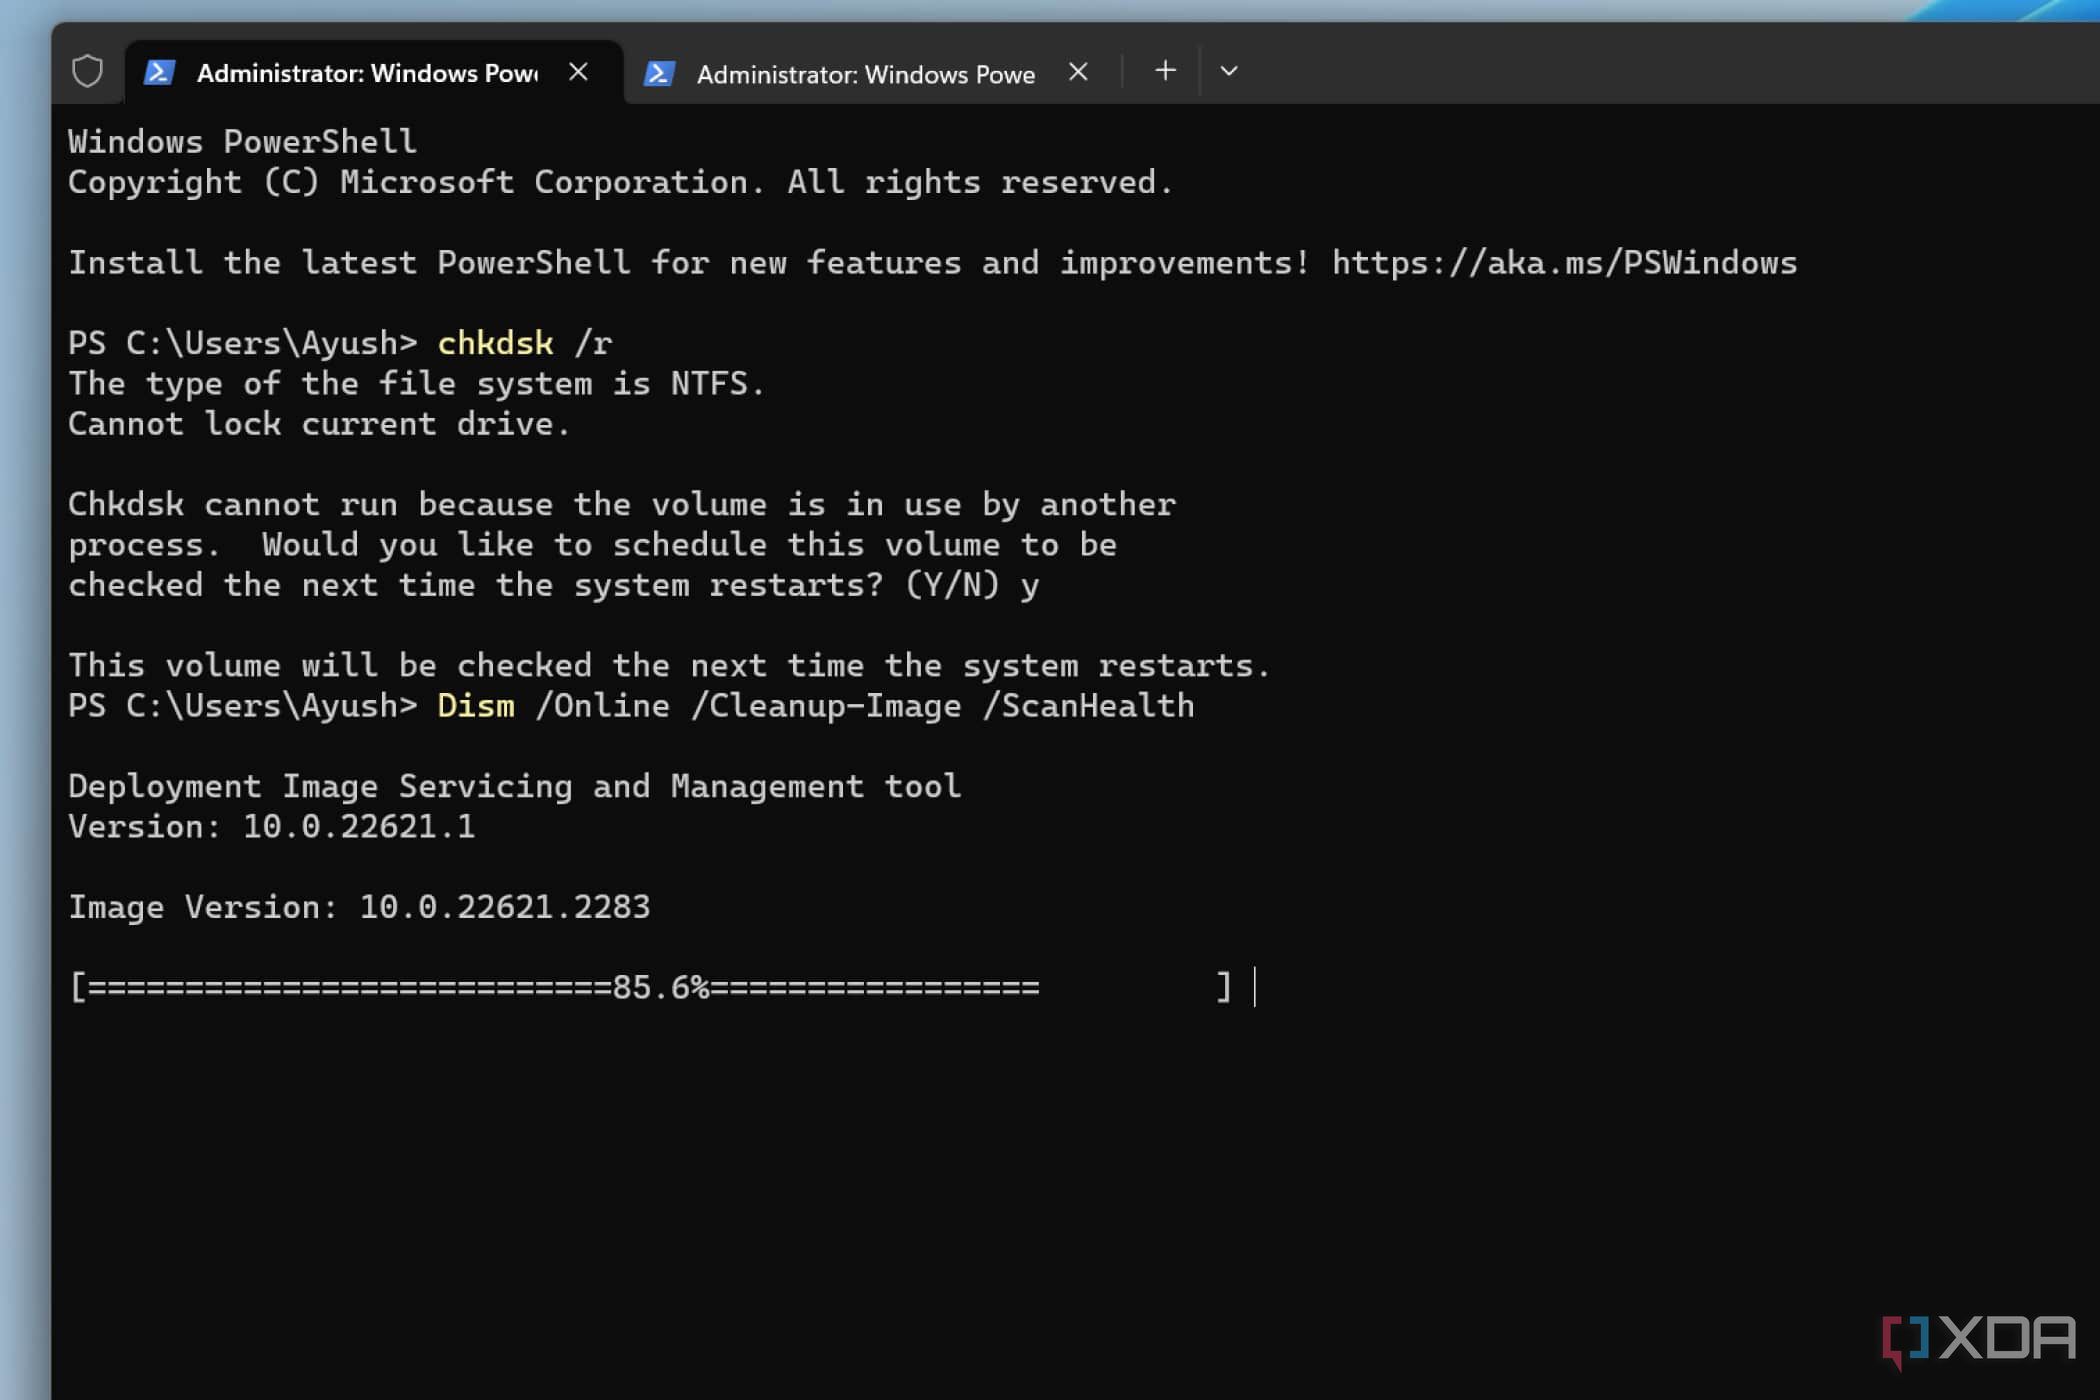
Windows Terminal is Microsoft’s latest terminal emulator that supports multiple command-line applications and shells. As a result, you can access many powerful utilities to help troubleshoot your PC, with CHKDSK, SFC, and DISM being three such commands.
The best place to start is CHKDSK, which is short for "check disk." By scanning and repairing bad sectors in your boot drive, CHKDSK can fix data corruption errors plaguing your system.
- Right-click on the Start button and choose Terminal (Admin).
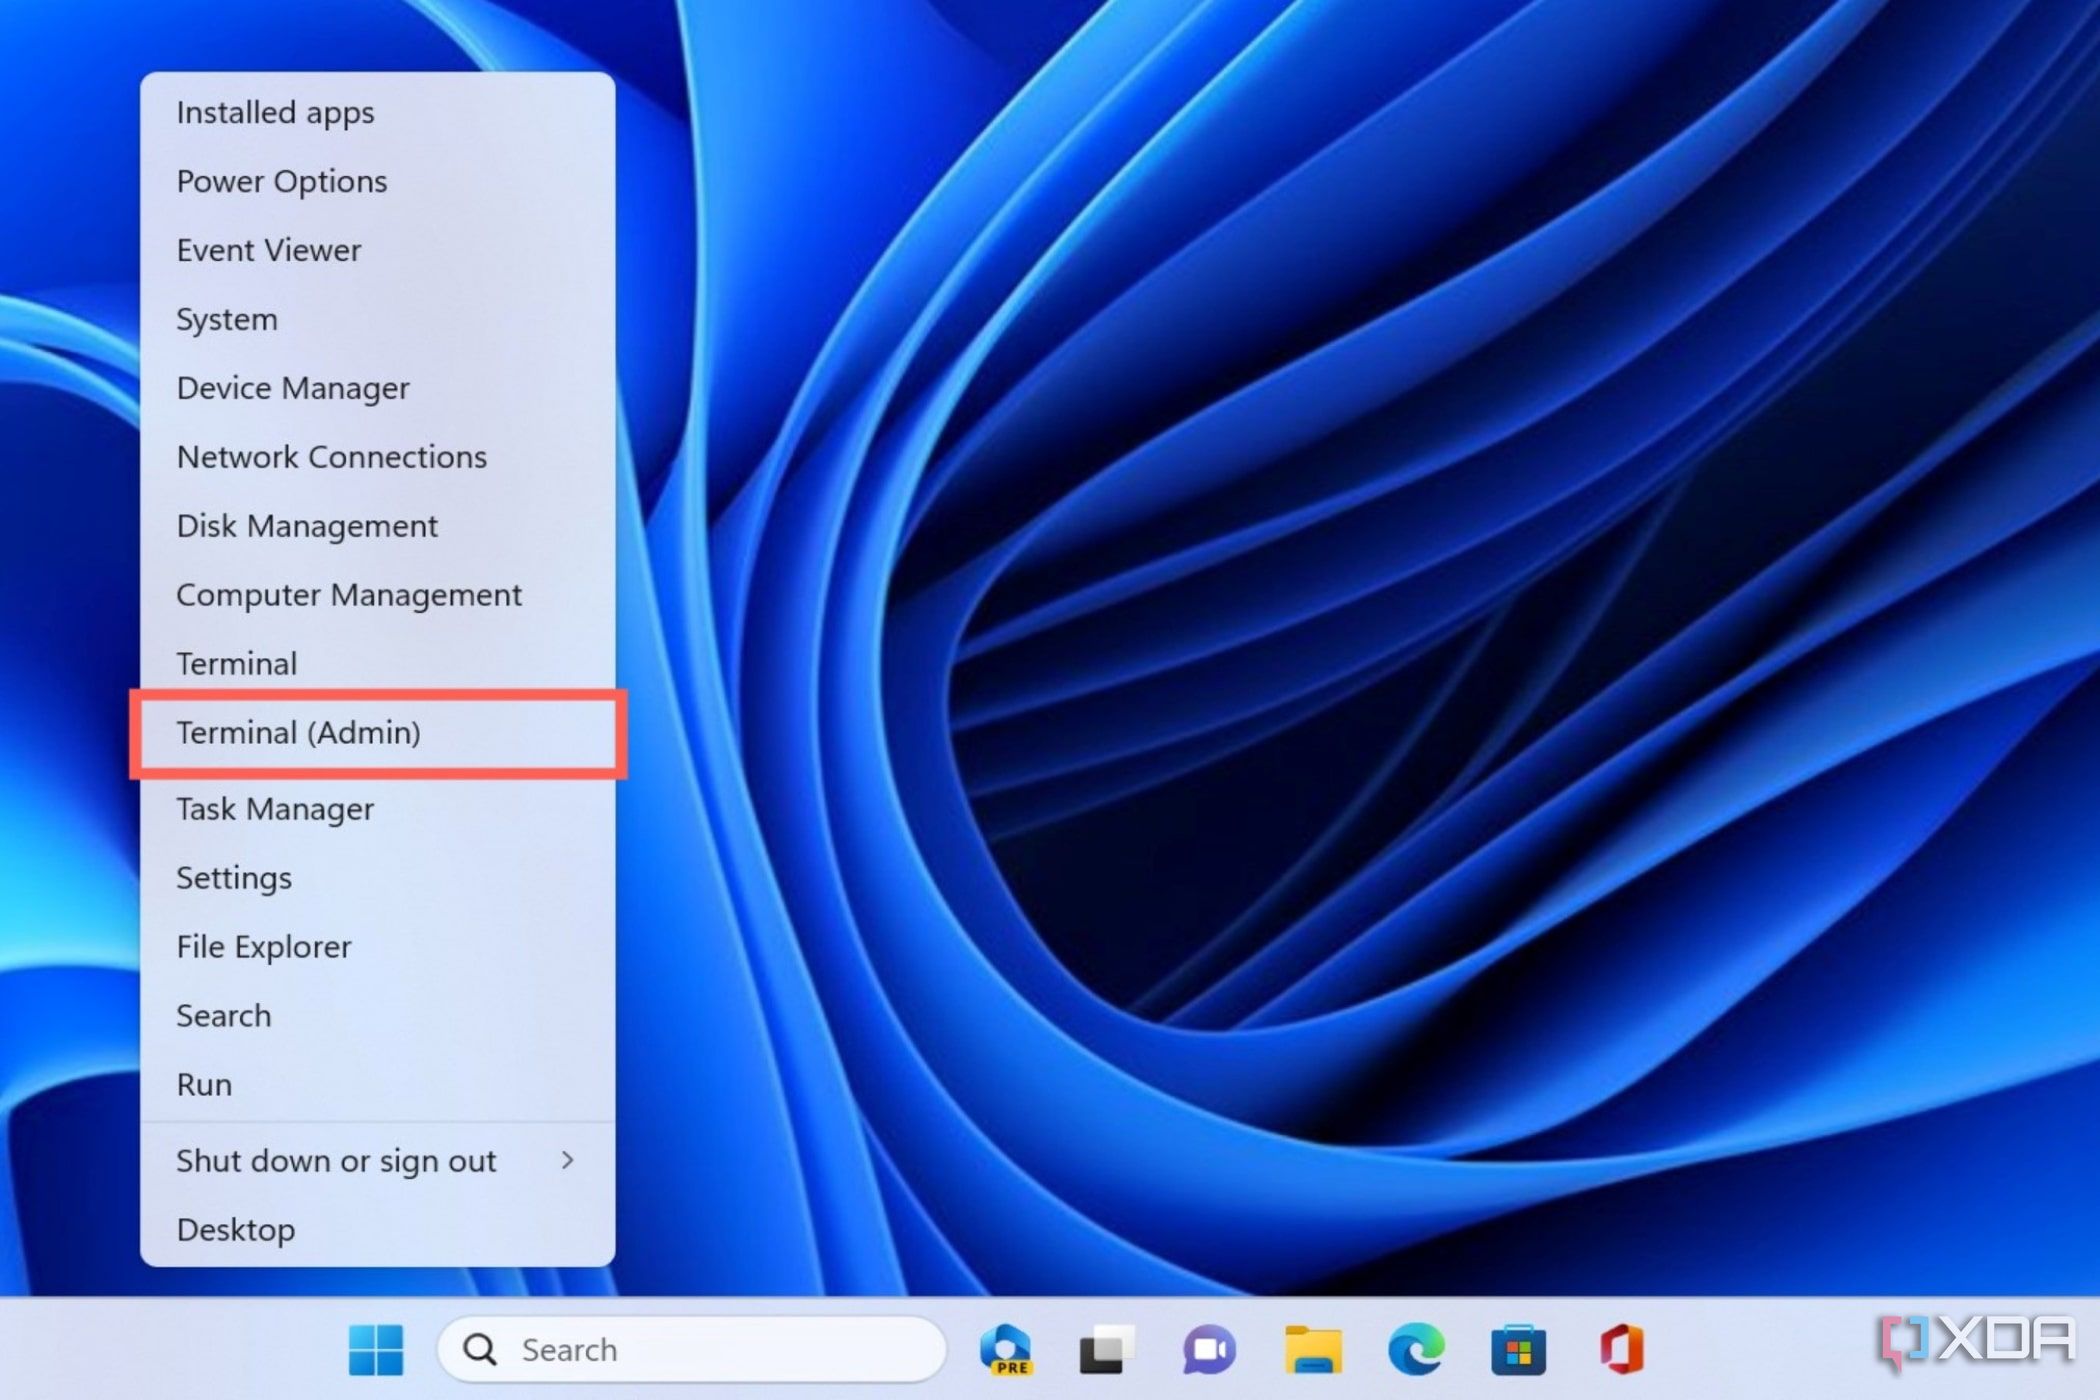
- Press Yes when prompted for administrator access.
- Type the following command and press Enter.chkdsk /rThe chkdsk command needs to run before Windows boots, so you'll be prompted to run the scan at the next restart.
- Press Y and hit Enter.
- Restart your PC to run the scan as soon as possible.
If this proves to be ineffective, the next step is using Deployment Image Servicing and Management (DISM), a repair utility that allows you to diagnose and fix system images. Microsoft recommends you run this command before SFC when repairing the Windows Image.
- Type the following command and hit the Enter key.Dism /Online /Cleanup-Image /ScanHealthThe scanhealth command will check the Windows image for component store issues.
- If any issues are detected, enter the following text and press Enter to fix them:Dism /Online /Cleanup-Image /RestoreHealth
- Restart your system.
Finally, you should run System File Checker or SFC to detect corrupted system files and replace them with fresh versions.
- Type the following command in Windows Terminal and hit Enter.sfc /scannow
- Reboot your system once Windows Terminal finishes executing the SFC command.
How to repair Windows 11 using Windows Recovery Environment (WinRE)
If the Windows Terminal commands fail, you can use two methods built into the Windows Recovery Environment to repair the OS. The Startup Repair facility can analyze the system logs to troubleshoot boot issues, and can even fix them without further input from the user.
- Open the Settings app and click on Recovery under the System tab.
- Hit the Restart now button next to the Advanced startup option under Recovery options.
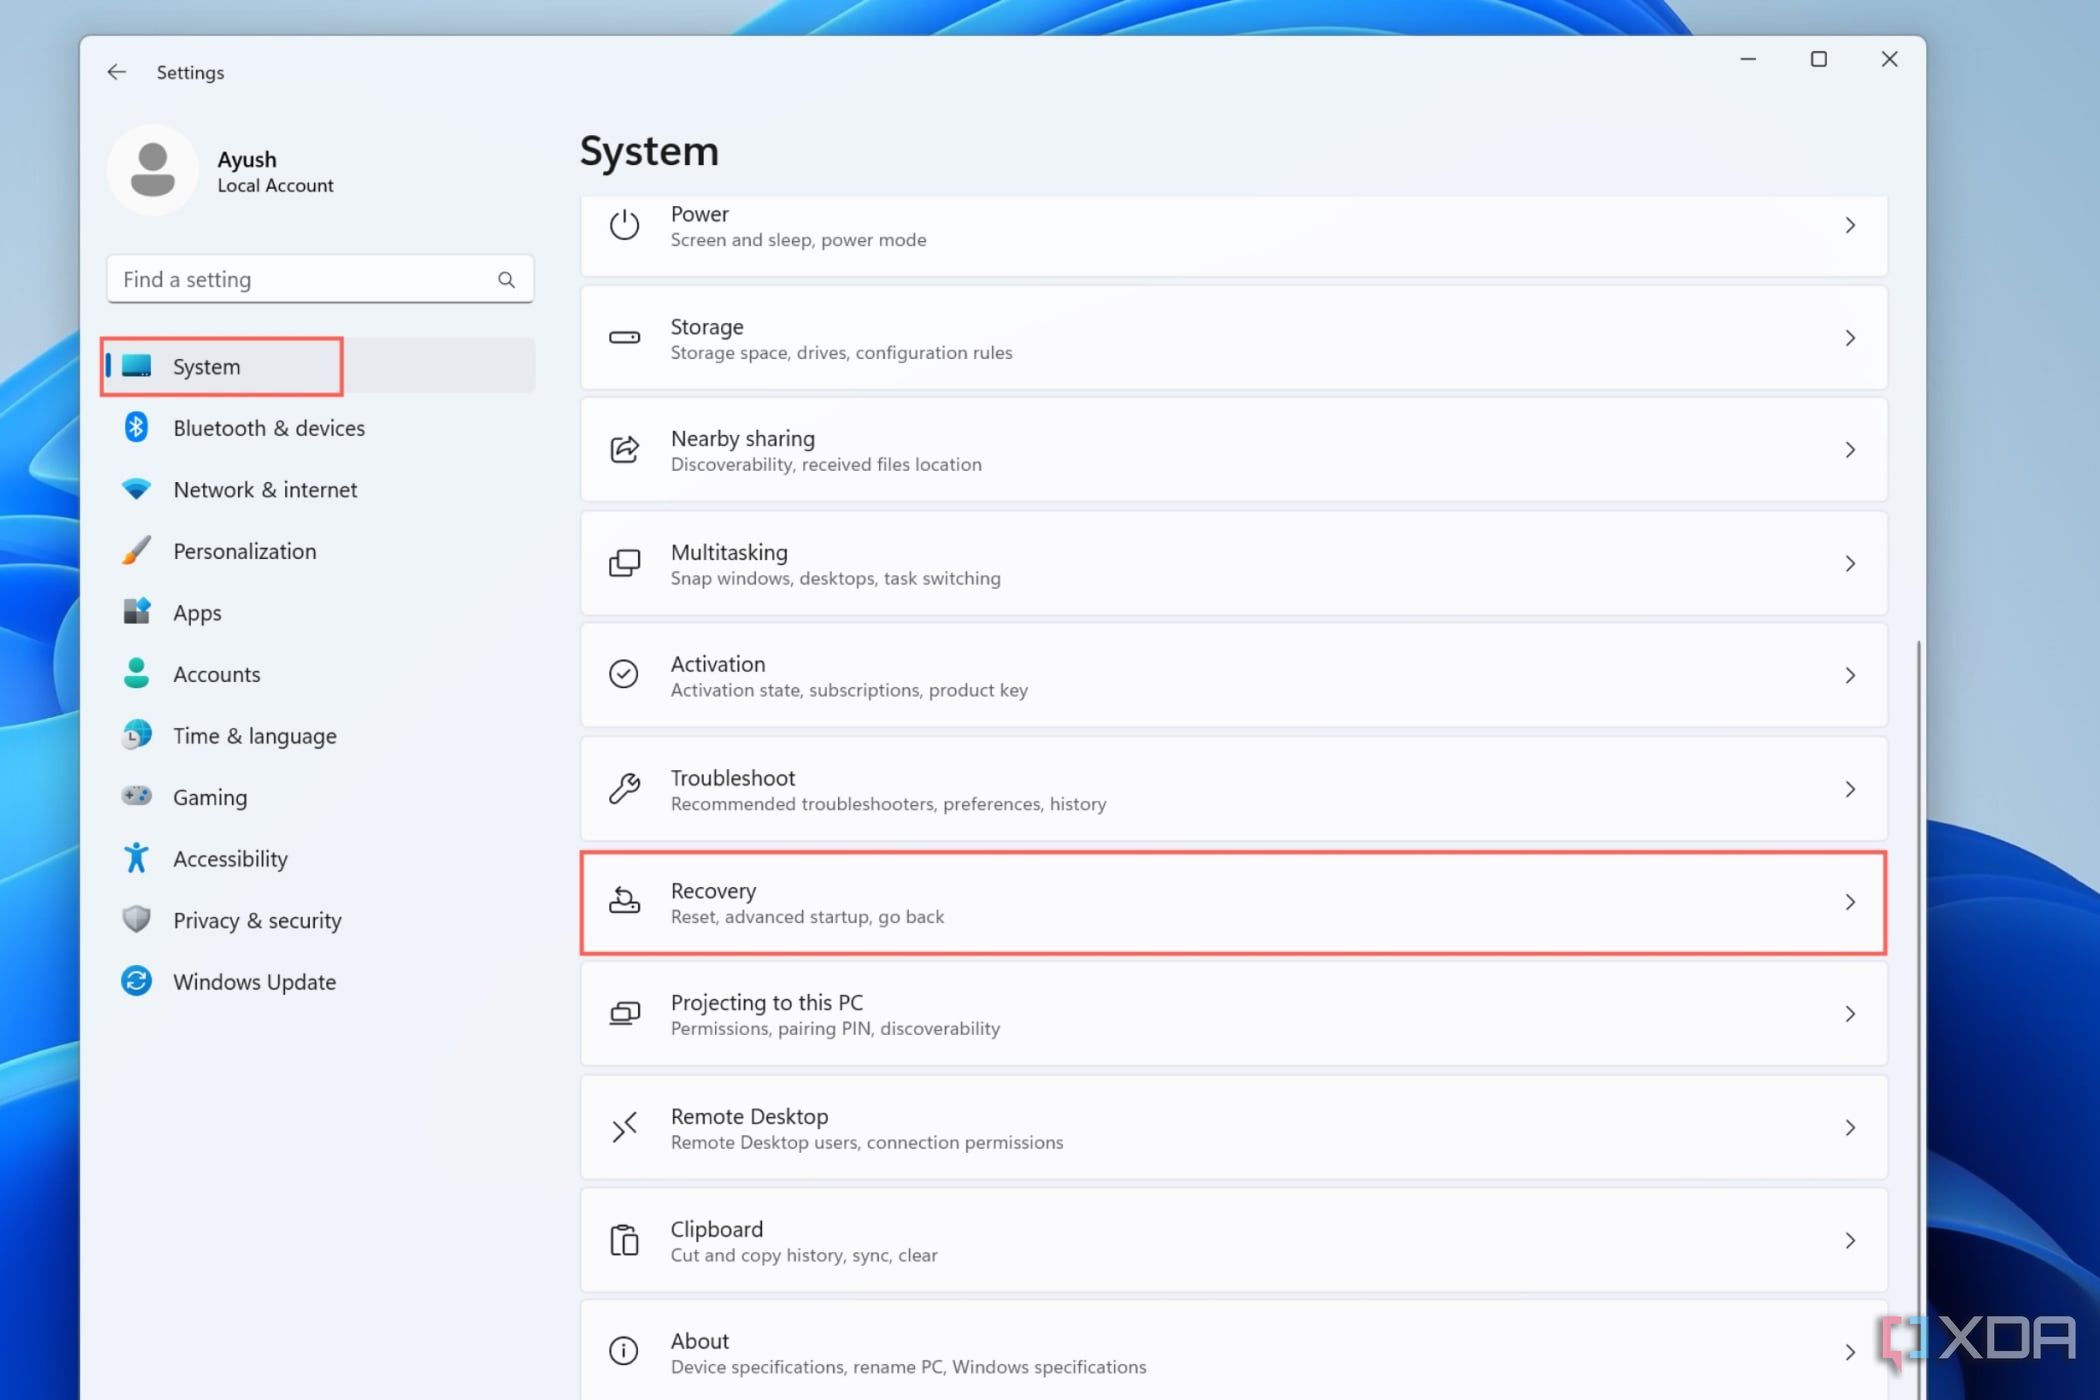
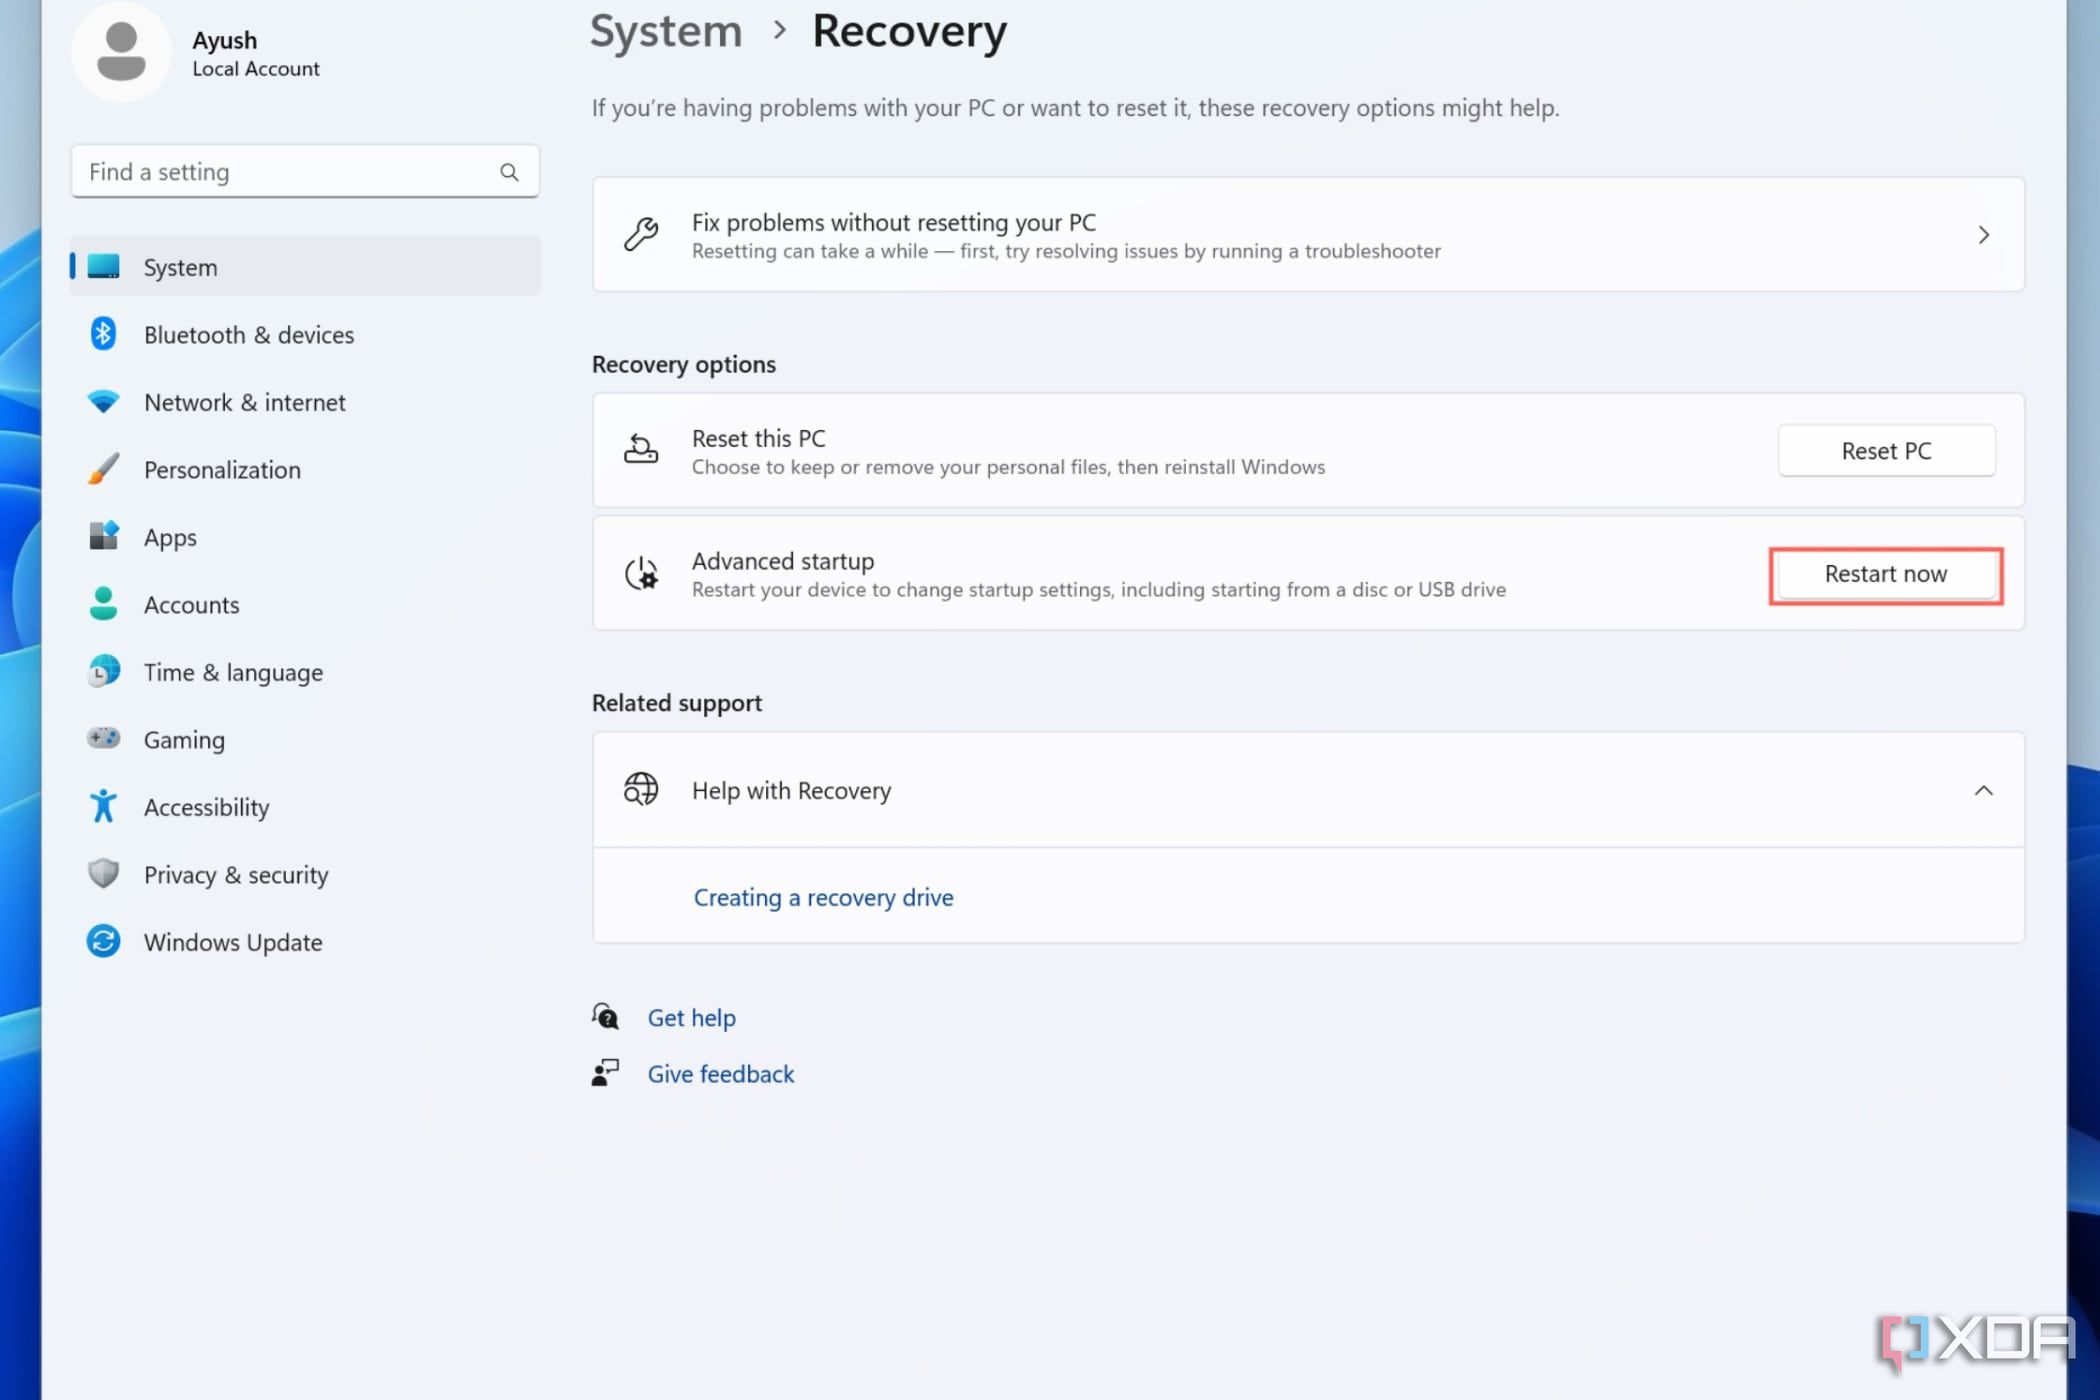
- Choose Restart now once again when prompted.
- Click on Troubleshoot after your PC reboots into the Windows Recovery Environment.
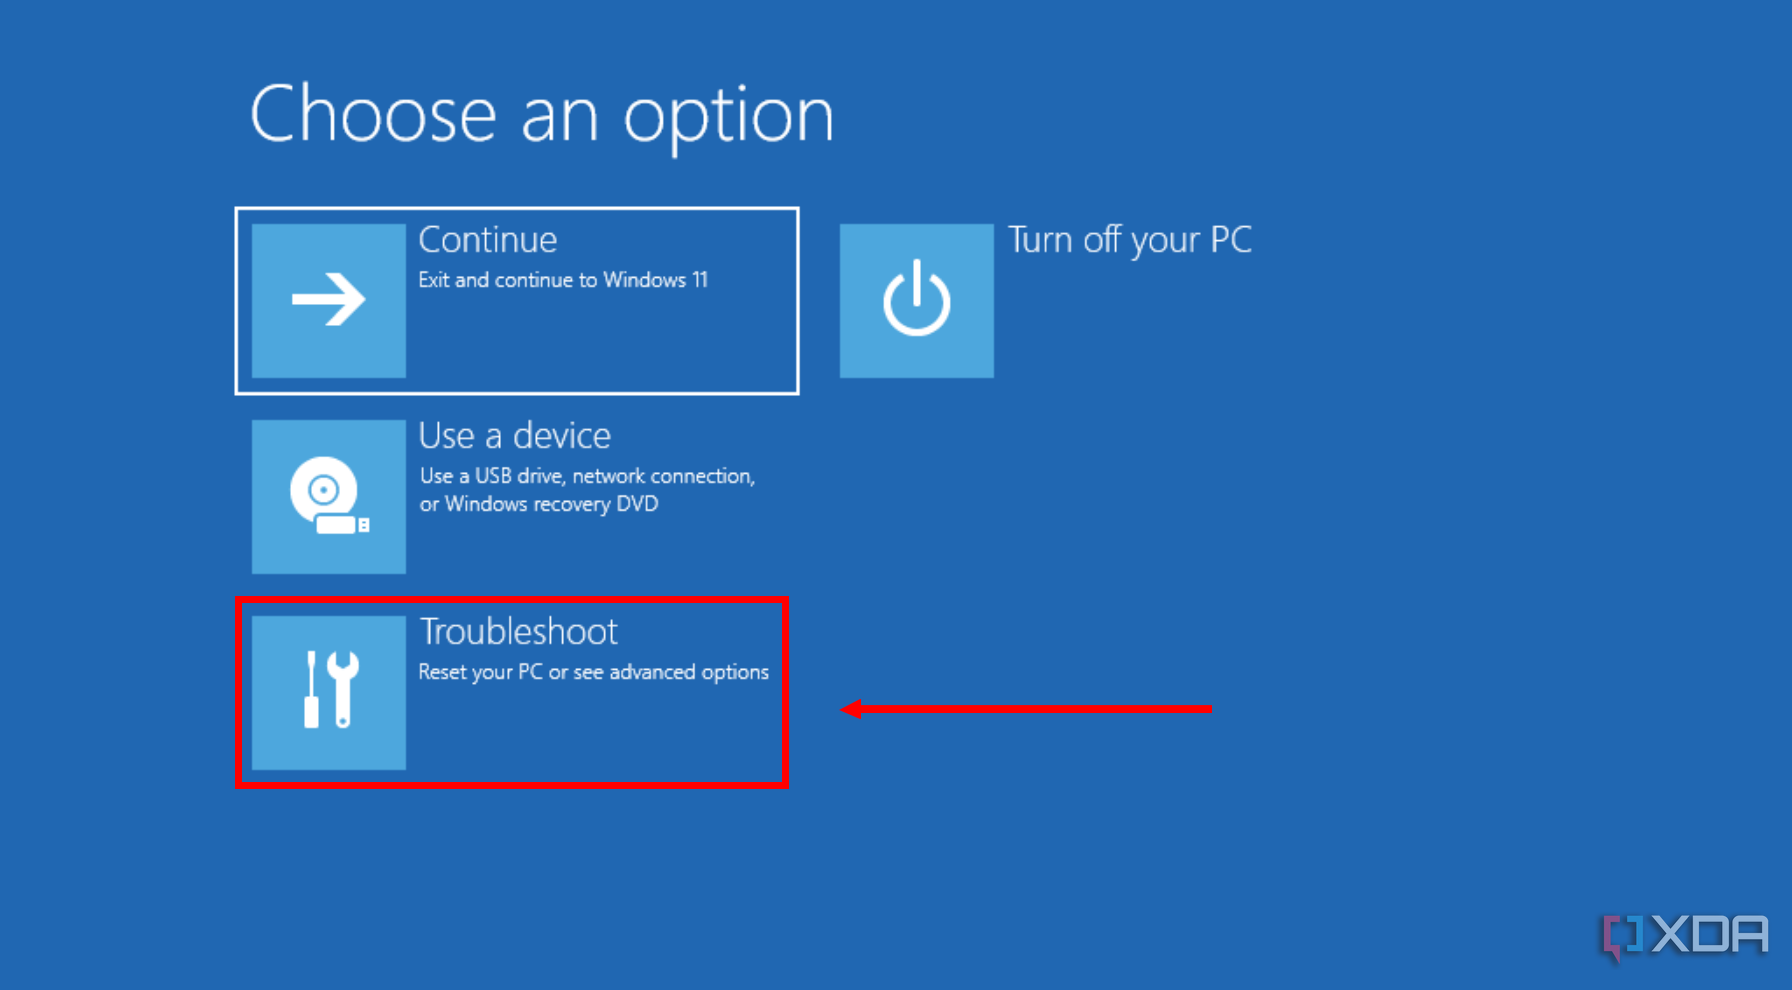
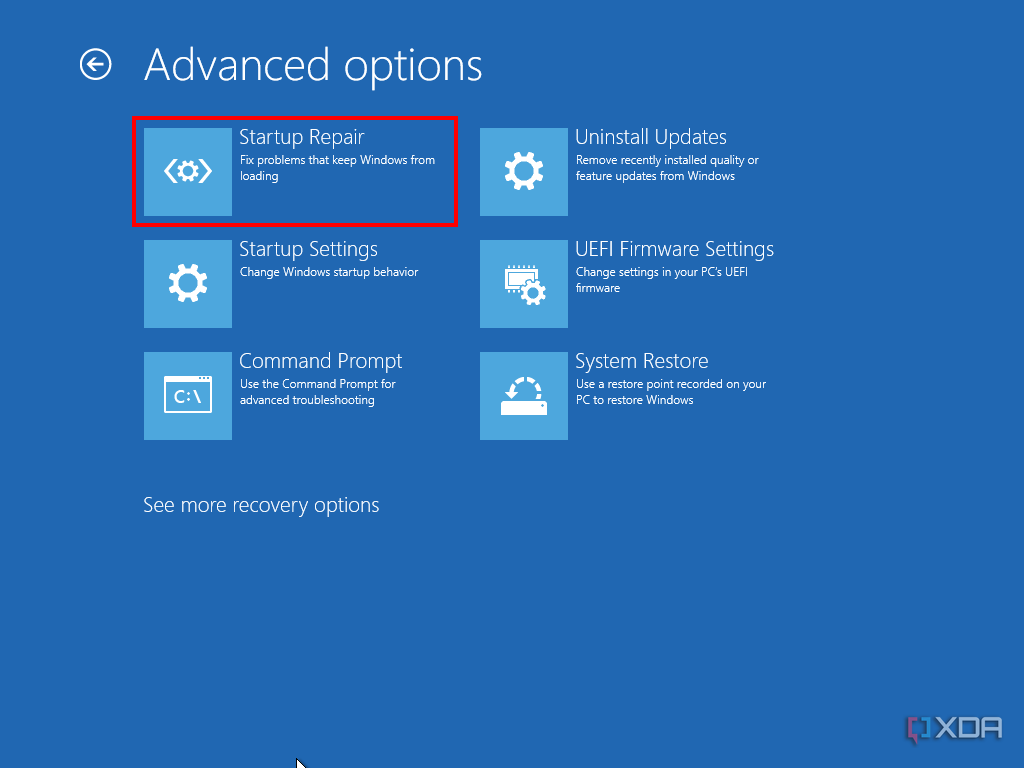
- Select Advanced options.
- Choose Startup Repair.
You can also run the Bootrec.exe command in the Windows Recovery Environment to resolve issues affecting the Master Boot Record (MBR), boot sector, and Boot Configuration Data (BCD) store. As with the Startup Repair method, you’ll need to enter the Windows Recovery Environment to use this command.
- Once you’re in the Windows Recovery Environment, click on the Troubleshoot button and select Advanced options like you did earlier.
- Choose Command Prompt.
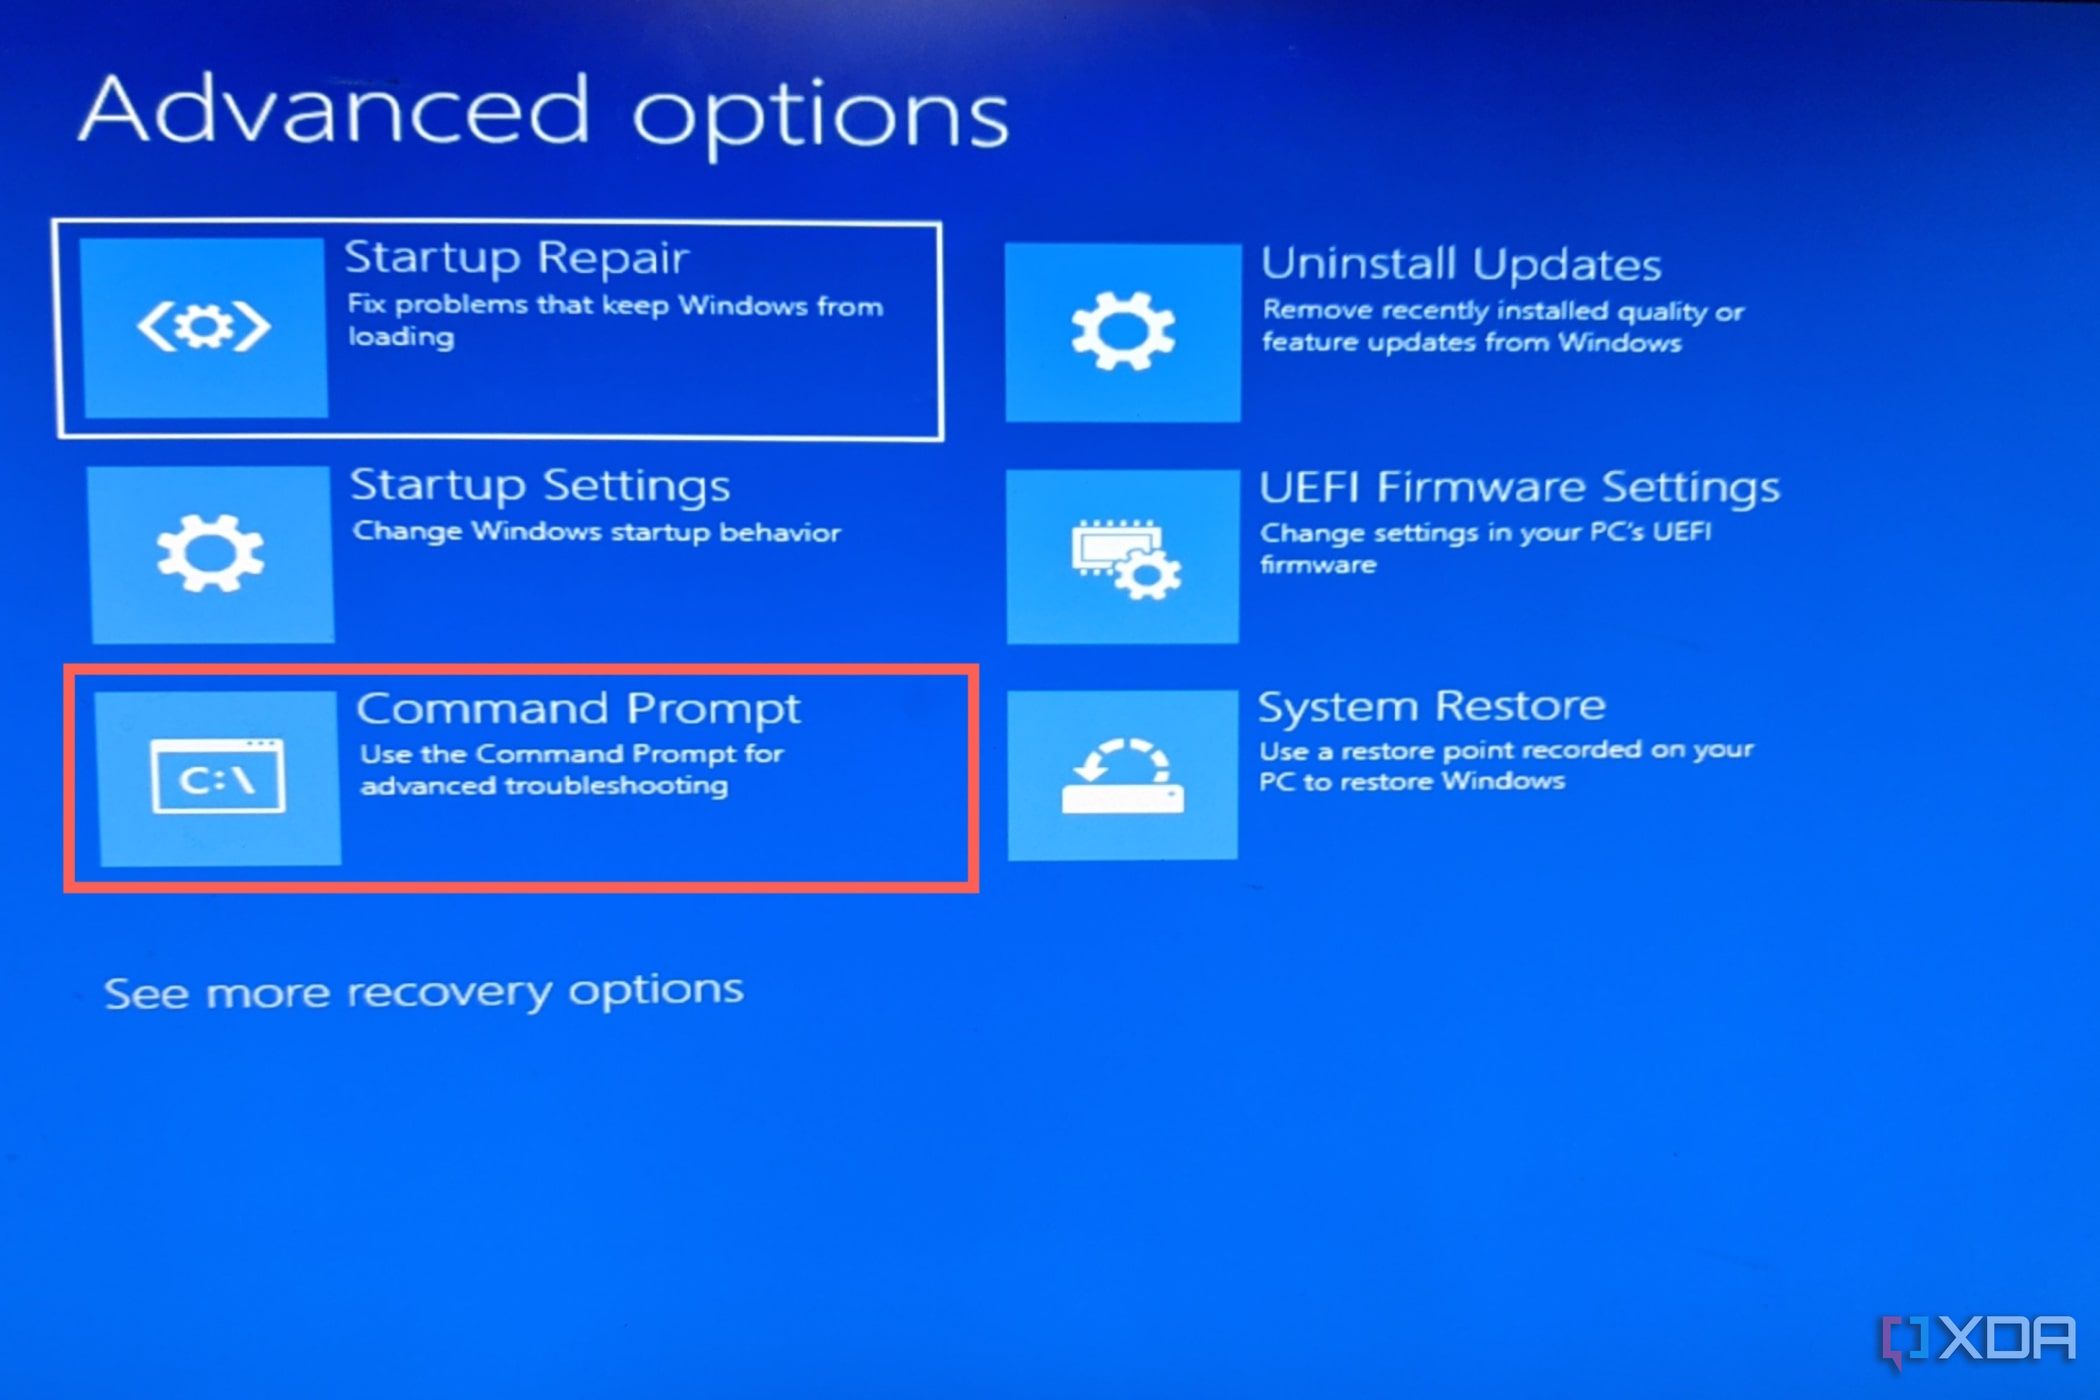
- Run the following commands one by one
- Bootrec.exe /FixMbr
- Bootrec.exe /FixBoot
- Bootrec.exe /RebuildBcd
- Restart your PC after executing the three commands.
How to repair Windows 11 using System Restore
As mentioned earlier, the System Restore feature built into Windows allows you to roll back any changes made after the creation of the restore point. Fair warning, while you can use it to fix system file corruption, you may lose important data, so you should proceed with caution. Any changes made to your files since the last restore point will be lost when you revert to it. Also, you can only use this method if you have a restore point created well before you first encountered the errors on Windows 11.
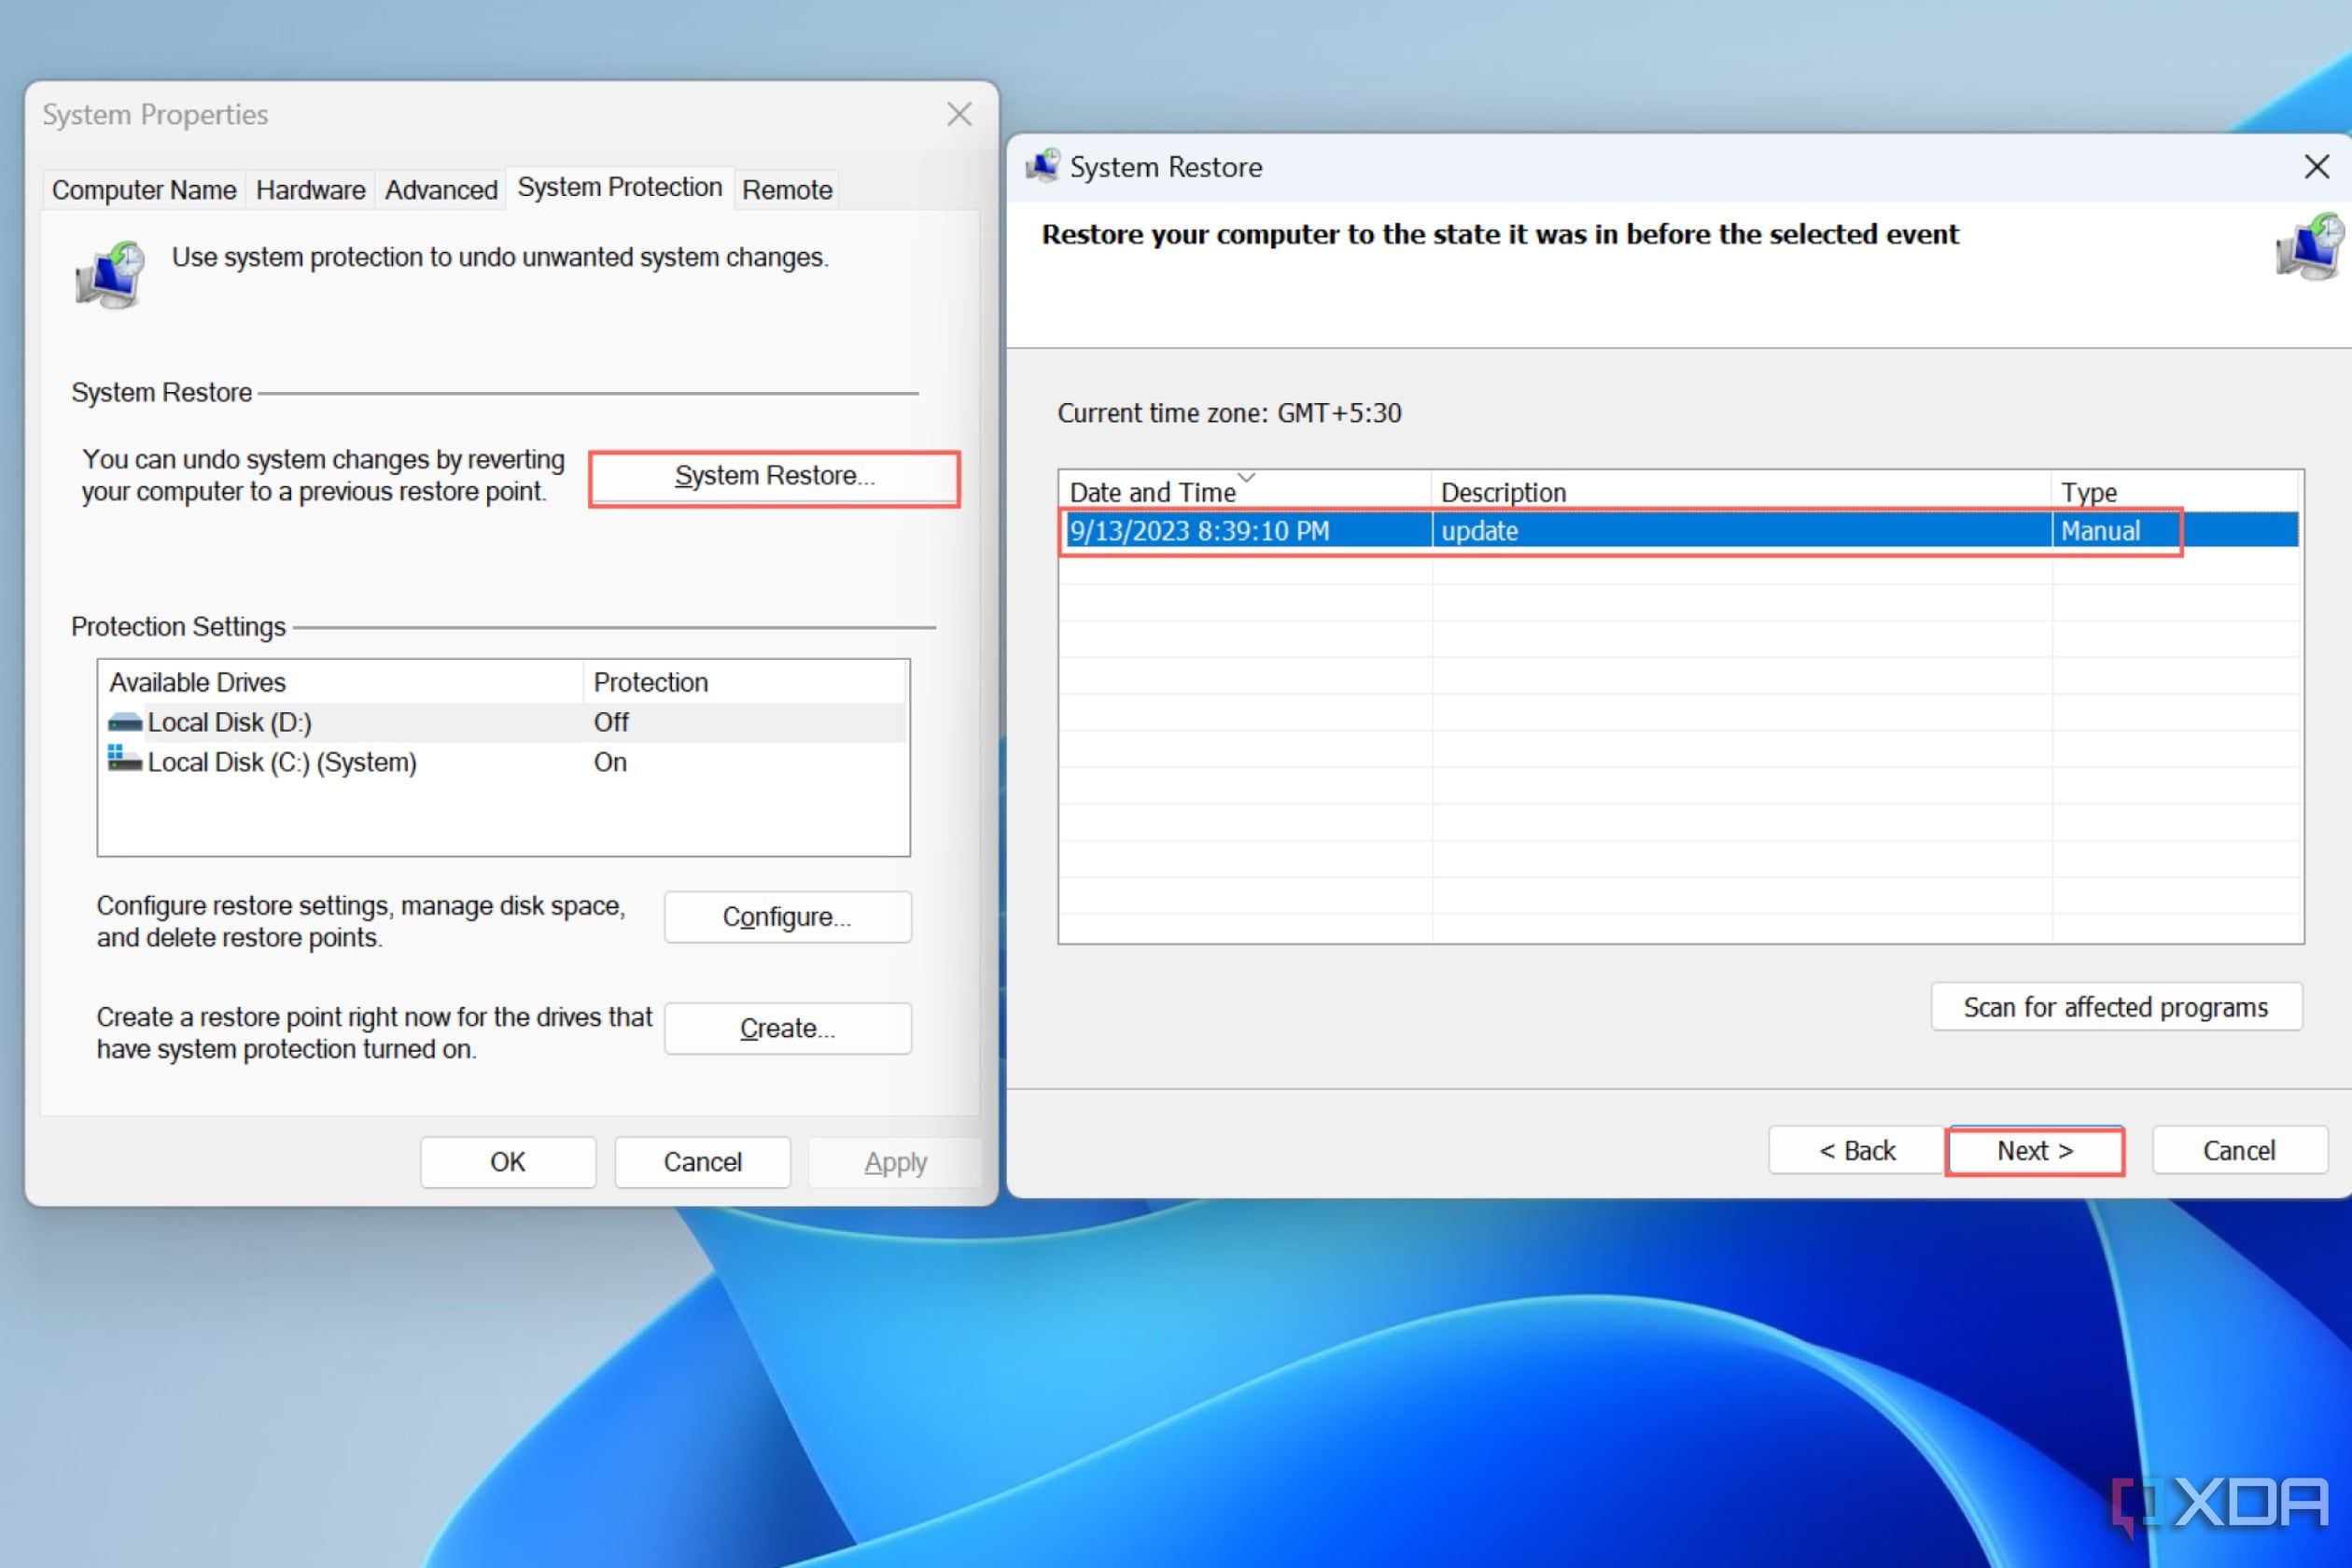
- Open the Start menu and type Restore Point into the Search bar, then choose the Create a restore point option.
- Choose System Restore on the System Properties pop-up window.
- Pick the Restore Point you'd like to revert your system to, press Next, and hit the Finish button.
How to repair Windows 11 by resetting your PC
If System Restore was unable to repair Windows 11, you’dll have to resort to reinstalling the operating system. Fortunately, the Reset setting allows you to keep your personal files, although you’ll have to download all of your apps again afterwards.
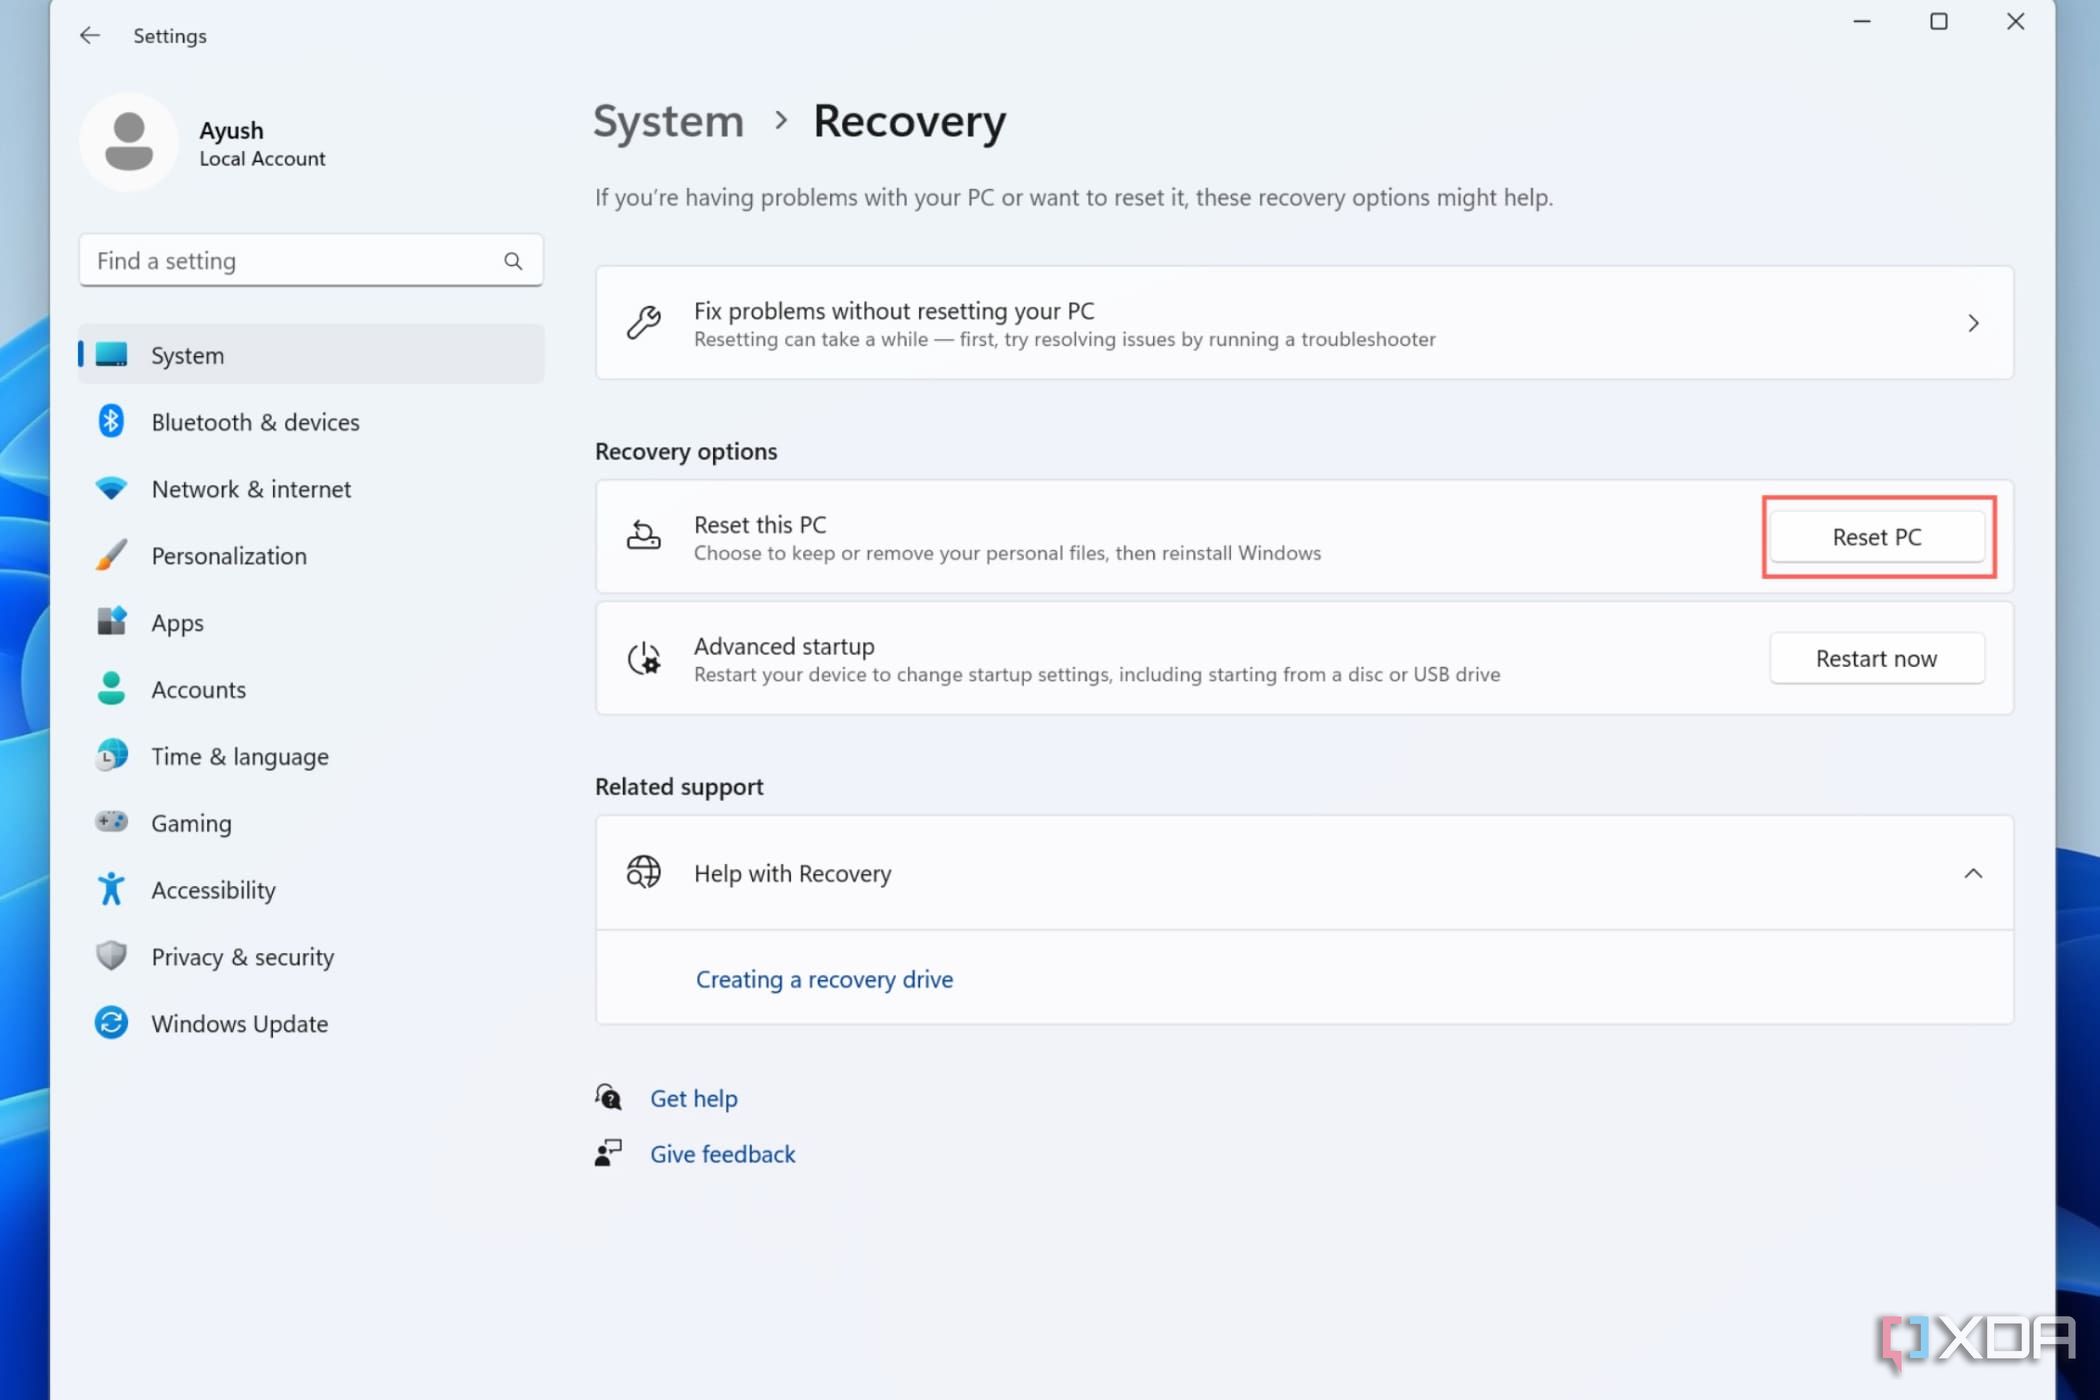
- On the Settings app, click on the Recovery option under the System tab.
- Select Reset PC under Recovery options.
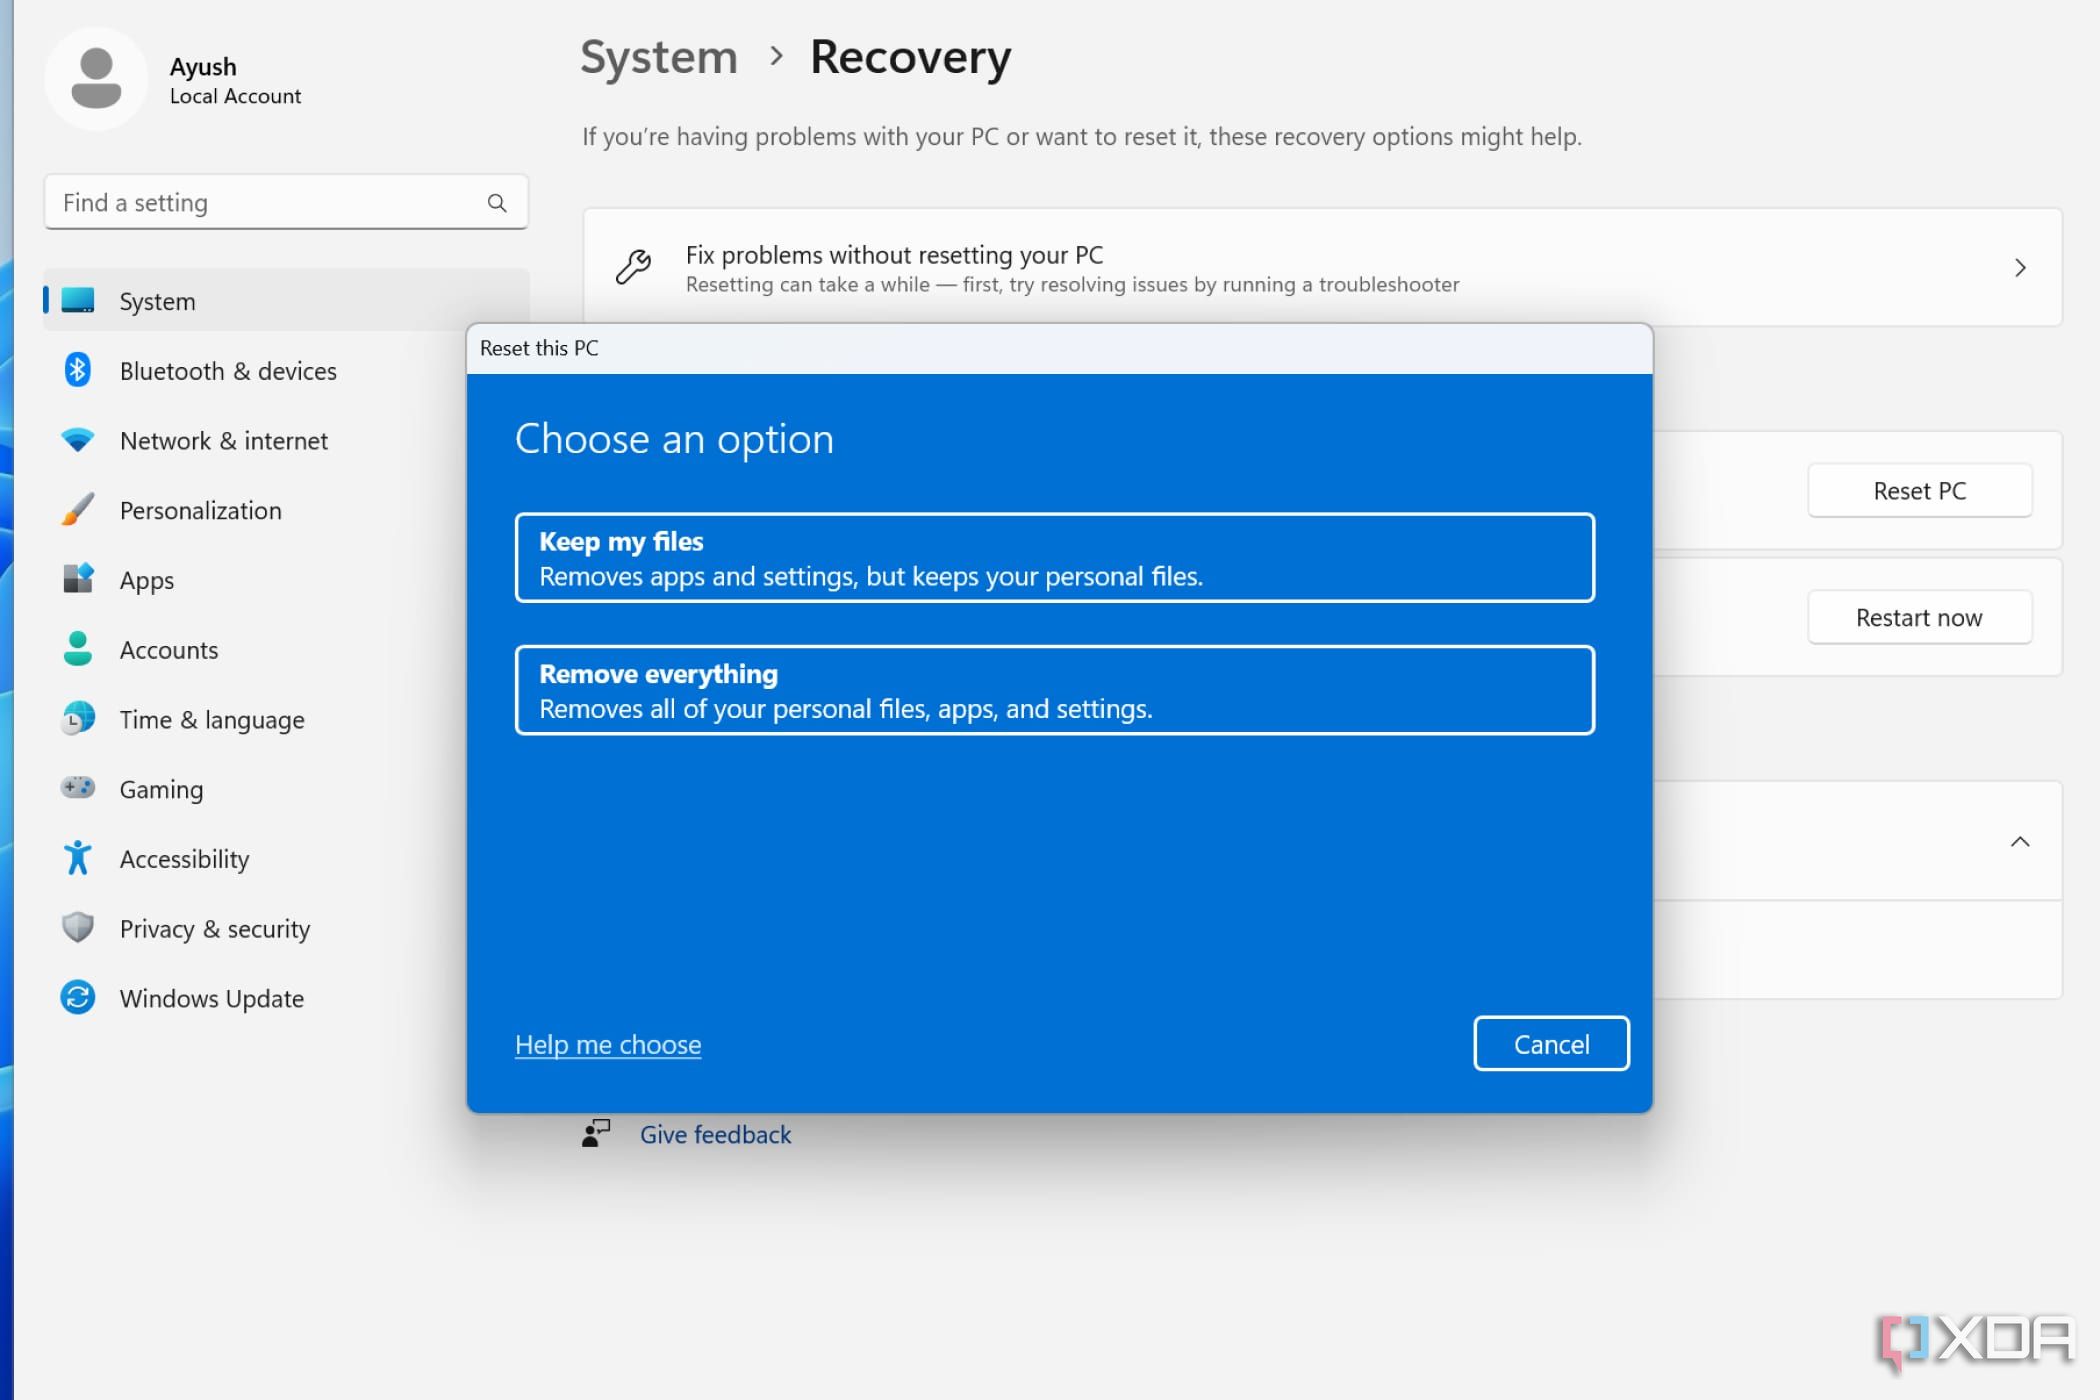
- Click on Keep my files (recommended) or Remove everything (caution, this would delete your information).
- Click through the remaining steps to begin resetting your PC.
How to repair Windows 11 by reinstalling Windows
If all else fails, your best bet is to reinstall Windows from scratch, but thankfully, this is easier than ever to do in the latest version of Windows 11. Microsoft recentlyt added an option that allows you to reinstall Windows by downloading it from Windows Update, while retaining your personal files and apps. Here's how it works:
- Open the Settings app and go to System > Recovery.
- Click the Reinstall now button next to Fix problems using Windows Update.
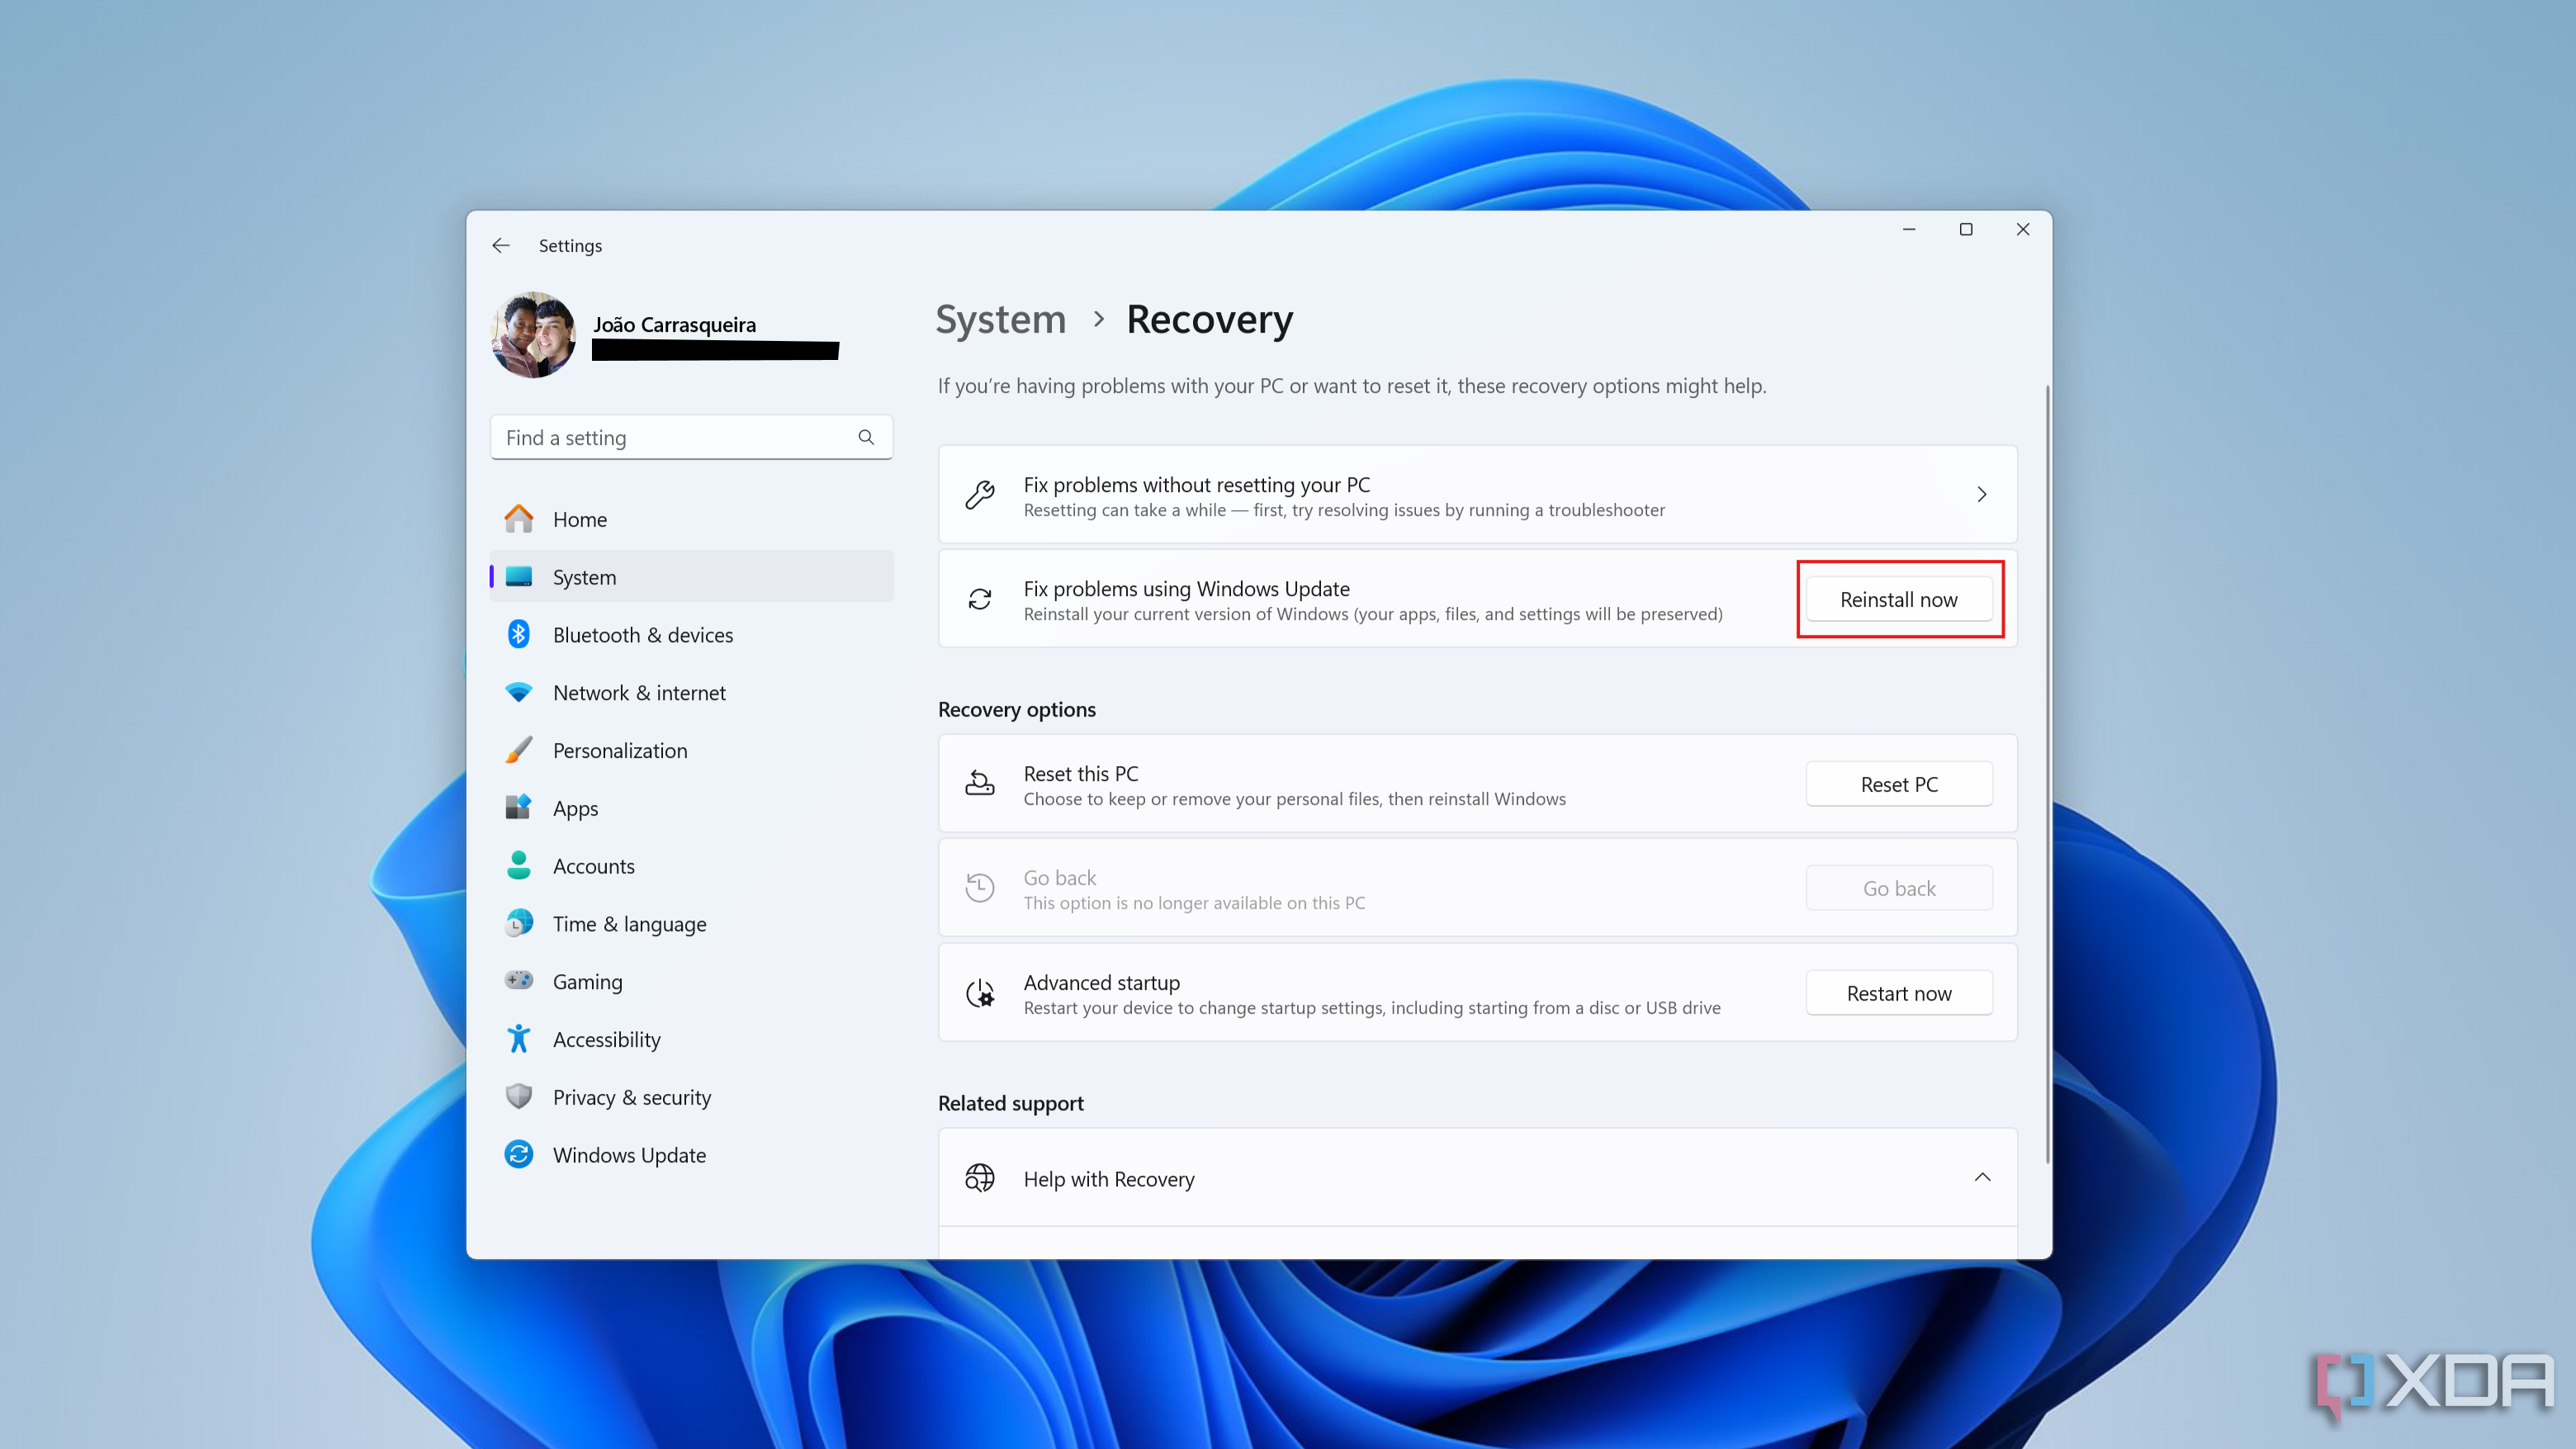
- If you want, check the box labeled Automatically restart my PC 15 minutes after installation.
- Click OK and you'll be taken to Windows Update to download the recovery package. Wait for it to download and install.
- Restart your PC and let Windows reinstall.
This feature is only available on newer versions of Windows 11, so you might not see it on your PC. If that's the case, your best bet is reinstalling Windows as if it was a new PC. This is a more involved process, as you'll need a flash drive and a couple of tools. You can check out more information about this below.
Final thoughts
These steps should help you fix any problems you're having with Windows 11, and most of these steps also work for Windows 10. If you continue to encounter crashes or BSOD after implementing all the fixes, there may be something wrong with the hardware of your computer (instead of a software issue). In that case, the software tweaks mentioned above wouldn't be intended to resolve what is going on. If so, you should consider replacing the CMOS battery as a depleted battery can also cause issues during startup.
Next, you should test your power supply using a multimeter to ensure it's in working order. If the PSU isn't the culprit, then you should start troubleshooting the other components of your PC, starting with the hard drive or SSD that you use as the boot drive, since the drive itself may be malfunctioning.
Aug 17, 2024 | Artificial Intelligence
Aug 17, 2024 | Artificial Intelligence
Aug 17, 2024 | Artificial Intelligence
Aug 17, 2024 | Tech News
Aug 17, 2024 | Tech News